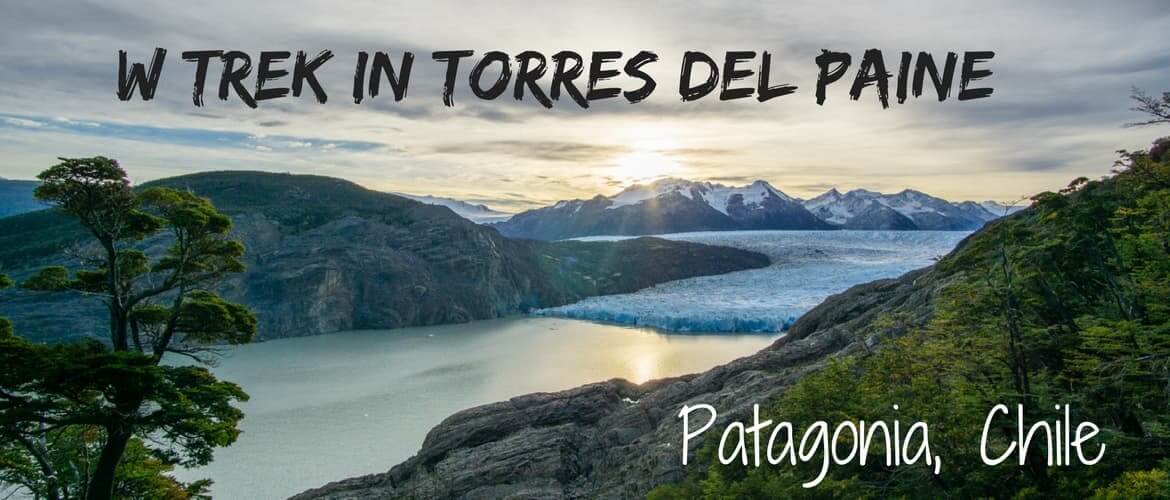
Chilean Patagonia is a dream for many people. It was ours as well. And it gave us everything we were looking for and more. I would never have imagined that trekking Torres del Paine National Park, one of the most famous national parks in the world, could become one of the best experiences in South America.
We chose to do Torres del Paine W trek and saw many beautiful landscapes, including glaciers, lakes and countless peaks in a span of just a few days.
If you’re interested in trekking Torres del Paine, you’ve come to the right place. Our story and detailed tips will show you how you can easily do it on your own and fulfill your dream of trekking in Patagonia.

Our experience with Trekking Torres del Paine W trek
We made our way through South America to Chilean Patagonia just in time for trekking Torres del Paine before they close for the season. It was in my head for years and now that we’ve come here, I was more physically tired that I’ve ever been before.
Just a few days before, we’ve been dragging all 4 backpacks and ourselves through a difficult border crossing from Chile to Argentina. Why do I say dragging? Because carrying a heavy backpack on my back, smaller one in the front and walking through the not-so-flat forest for 24 km wasn’t a piece of cake.
Puerto Natales to Torres del Paine
Here we are near Torres del Paine national park and all I wanted to do was sleep and eat. Do you want to know what happened? A volunteer in our hostel was a masseur. Lucky me! We took a 2-day break while he worked on my sore back and before we knew it, we were on a bus heading for Torres del Paine W trek.
Just looking out the window when entering the national park is a treat. Giant mountains peeking from the clouds inviting you to see them up close. My thoughts: “We’re coming for you.”

Day 1 – Paine Grande ranger station to Grey Glacier ranger station (11km)
Puerto Natales bus station at 7:00 am was filled with trekkers with huge backpacks and few locals heading to work. After two hours in the bus, we stretched our legs at the national park entrance. There were few buses already.
Everyone entering the park needs to pay the entrance fee here and watch the compulsory fire safety video. Apparently, there are still people who think Patagonian winds are just a breeze and they can set up a fire wherever they like.
This is the place where the bus emptied a little bit, trekkers heading for the O trek start here.
We spent another half an hour on the bus which took us to the shore of Pehoe Lake. We started our trek at Paine Grande ranger station, just half an hour across the lake by boat. The peaks of Torres del Paine were reflecting on the surface of the lake and we couldn’t wait to get closer.

As we stepped off the boat around noon, we put on the sunscreen while watching others preparing their hiking poles to the perfect length. Everybody was smiling and anticipating spending an awesome time in the mountains.
Few steps into the trek, a fox crossed the trail right in front of us. What a nice surprise and start of the trek.
The first hour was an easy walk. I was getting used to my heavy backpack and adjusting the straps maybe hundred times. It would soon become my most annoying companion of the trek.
There is a possibility of staying in expensive mountain huts called Refugios but we wanted to experience the real trekking, with carrying our house and kitchen on the back.
For most of the day, the Grey Lake and Grey Glacier was in front of us, which made the trekking with heavy backpack more bearable.
The sun was shining all day long and we had plenty of breaks. Can you blame us when the view looks like this?

Lunch break with a view of the glacier? I’ll take it.
The second half of the trail was harder, going up and down on rugged terrain. Our pace on the first day was slow, as we only had to cover 11km which took us 5 hours. We were taking the time to enjoy as much of the views as we could. When we registered at the campsite, right next to the lodge, we were surprised to find quite a selection of food available for purchase. If we knew earlier, we would have brought fewer snacks with us.
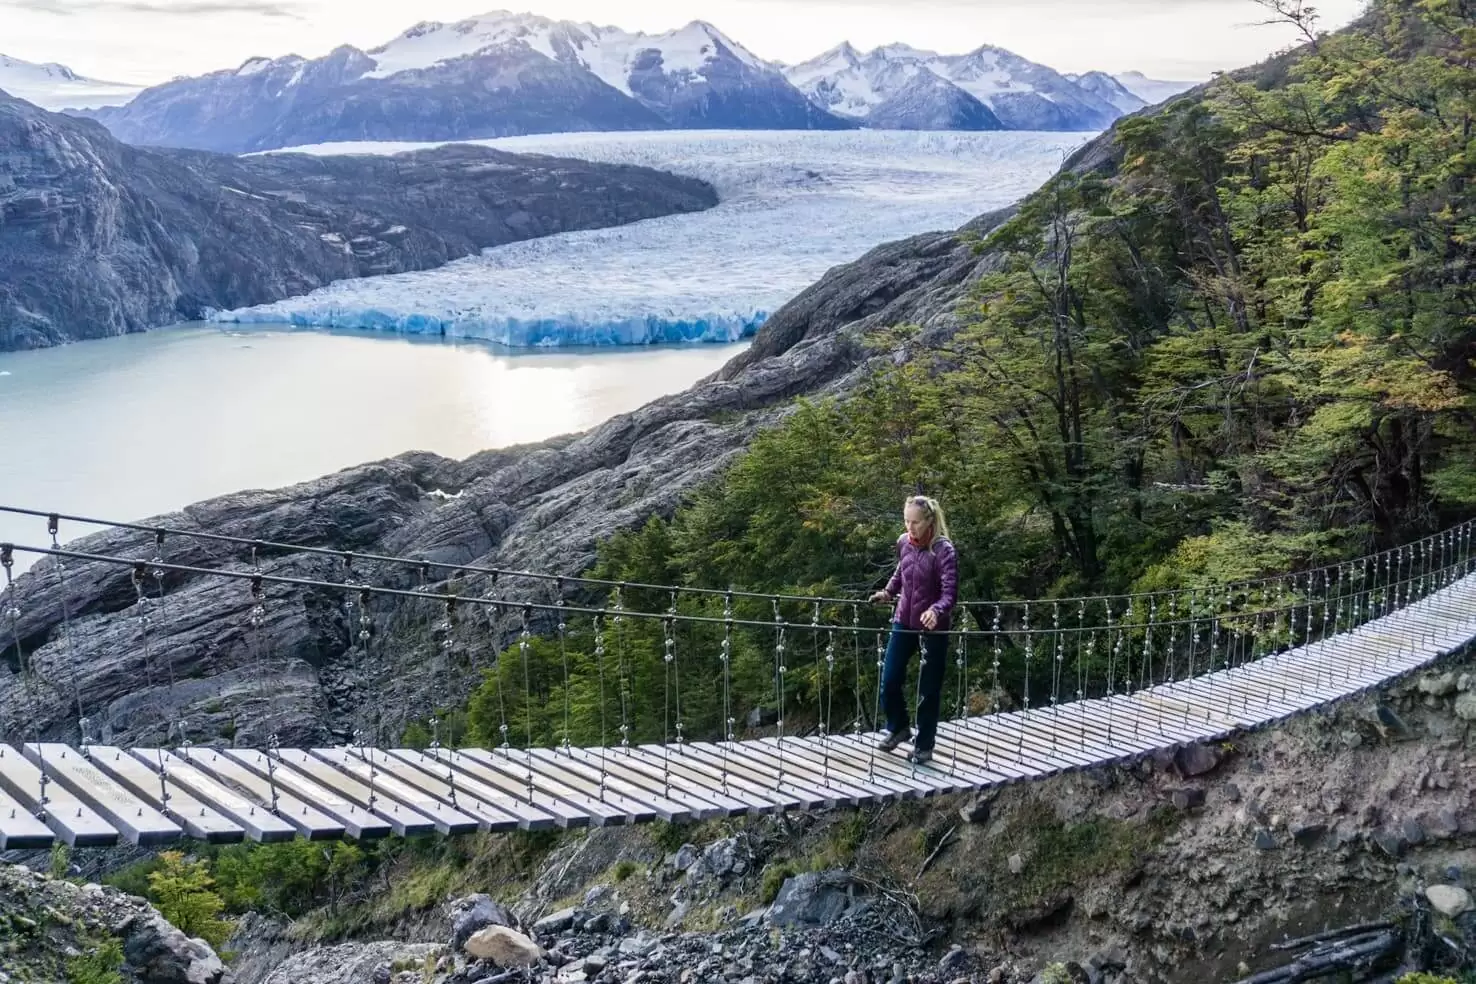
As soon as we arrived at the camp, we set up the tent, had a snack and wondered what to do with the remaining daylight. We left our stuff in the tent and went for a walk to the hanging bridge, just a few kilometers uphill.
It was the best decision of the day. The sun was slowly setting behind the enormous Grey Glacier when we walked across the hanging bridge. I wasn’t expecting such a romantic scene in the rugged mountains.
We cooked dinner in the cooking shelter where all trekkers gathered to eat and warm-up before heading to the tents. It was pretty clear we were staying at a paid campground. There was a sink for washing the dishes, hot showers and flushable toilets next door and an option to charge phones at the reception.
READ FOR INSPIRATION
50 insane pictures of Chile to inspire your travels
Day 2 – Grey Glacier ranger station to Italiano ranger station (18,5km)
When we woke up, the sky was cloudy and the morning breeze was warm. We made our favourite breakfast when trekking – oatmeal with chocolate chips, coconut flakes, chia and dried fruit/applesauce – we had a long way ahead of us.
Luck was on our side, it was warm all day even though it looked like it could start raining any second. And it did, just a little bit to remind us that sunny days are precious in the mountains.

10 km later, we arrived at the same place we started the day before, now continuing east to the next campsite. Despite the cloudy sky, we enjoyed the views of Nordernskjold Lake with mountains in the background and all around us.
We booked the Italiano campsite, a free campsite provided by the national park. Amenities are much simpler – cooking shelter consisted of a roof and a shelf, logs for sitting and dry toilettes.
The highlight of the day: a big white owl sitting on the tree branch. We spotted its big eyes watching us while washing the dishes at night.
Day 3 – Italiano Ranger Station to Frances Valley and Frances Campsite (12km)
The day we spend without our big backpacks is always a good day.
We packed up our camp, put the backpacks near the ranger’s station and left to see the Frances Valley. It started raining shortly and rained the whole day. We couldn’t care less. Yes, the views were less impressive because we didn’t see the peaks but we felt so light without the backpacks that the whole day on the feet seemed to pass very fast. We even raced who could be down sooner.

On the way back we took the backpacks (because you’re only allowed 1 night at free camps) and made our way through the mud to the Frances camping zone. This campsite has very modern facilities, nice bathrooms, hot showers, drinks and food in the restaurant with possibility to charge electronics and even internet.
It was pouring rain and we had a hard time setting up the tent without getting our stuff wet. Lovely staff from the refugio let us cook and hang out in their restaurant. It was very cold but hot showers, heated restaurant and chatting with fellow trekkers brightened up the day.
Mice were running on our platform right next to the tent and kept us awake. But we were warned up front of the mice in the camps. Leaving all the food in a bag hanging on a tree branch every night was a good idea. But tonight, those sneaky mice thought we left food in the tent. The plastic rain poncho we left inside makes a similar sound to any plastic packaging of the food. They bit through the tent in several places.

Apparently, it happened to many other people and not only in this camp. Mice got so used to people bringing food so they go after anything left on the ground in the plastic bag. I forgot about wrap paper from granola bar in my side pocket, well, now I have holes in my backpack as well.
An Australian girl ended up with a few holes in her jacket. I think it’s safe to say not to bring your best gear on this trek.
Day 4 – Frances camping zone to Torres Ranger Station and camping zone (24km)
Waking up to the rain, dark and ruined gear was not the best start of the day. It was raining until noon but on the other hand, most of the trek was flat. The day seemed to go forever and I realized that dragging all that stuff on my back is probably not the smartest use of my spine. If it wasn’t so expensive to stay and eat at refugios, I would much rather go for a nice trail run between them completing the “W” running.
Has anybody ever run the W trek? I think it’s possible.
Maybe a bold idea but I think we would be able to finish it all the way. 80km in 5 days is not that much if you think about it. Ah, all the crazy thoughts going through your mind when you’re away from the city, traffic, the internet, people and a real bed. Your mind relaxes completely when you are away from your daily routines.
We had to cross a big section of the trail through ankle deep mud. As I was jumping my backpack threw me off balance and my foot ended up in the mud. The first second of being shocked was quickly changed into laughter. Nothing horrible happened if you think about it. So my foot was going to be a little wet, no big deal. Better to laugh it off than stress too much about it. I couldn’t change to other spare boots so I better keep walking to keep the foot warm.

Even our fellow trekkers from Australia couldn’t believe I’m laughing after what happened. That’s when they came to the rescue with hiking poles. I swear this was the first time I needed them. I just couldn’t jump from one drier area to another with the backpack on, to cross the mud.
Through experiences like this, we bond with people who become our friends. You just laugh about the joys of the day in the mountains and other fun outdoor stories. The best friendships are formed over experiences like this.
Just as we started to trek the last part of the letter W, the trail went uphill. We had many snack breaks during the day trying to eat a lot to lighten up the backpacks.
The trail from the Hotel Las Torres to the Torres lookout is the most used part of the whole trek. With people coming from the hotel or Puerto Natales for the day to see the famous Torres, we all share the trail, together with horses supplying the refugio Chileno Lodge.
When we saw the horses crossing the creek near the lodge, it hit us. The water in Torres del Paine can’t be 100% harmless, even though park officials try to convince you of that if you collect water upstream. We always do. In this park though, you never know how far upstream it’s still safe. There are people camping with special permits away from official campsites and washing dishes in the streams.

It’s true that Patagonia has very clean and safe water, just not Torres del Paine.
There are enough streams along the trail from which we could refill our water bottles; I just wish we brought the filter as well. Don’t make the same mistake as us and use [easyazon_link keywords=”hiking water filter” locale=”US” tag=travelwitht05-20″]water bottles with a filter[/easyazon_link].
Thousands of people are visiting the park every year with many animals living in the park (the biggest issue is a number of mice). There is no way you can drink the water from the stream and not worry about your health. If you are planning to visit, make sure you read our post about how (not) to get beaver fever in Torres del Paine.
We booked the nearest camp to the Torres towers so we can hike up early the next day and see the sunrise. Just as we came close to the Torres camping zone, it started to snow. What seemed like a magical scene, turned into a cold evening and freezing night (-5°C). It’s a free campsite with basic facilities, our last camping (pasta) dinner filled our bellies and we curled up for the night very early.
Day 5 – Torres Lookout to Las Torres hotel and Puerto Natales (11km)
Waking up at 6:30 for the sunrise is not bad at all. In April, it was late autumn and the sun comes up around 8:20. We had breakfast, packed our camera and sleeping bags and started to hike up to the Torres Lookout.
Once we arrived at the lake, people have scattered all around in their sleeping bags waiting for the sun to rise. It only took 45 minutes to get here, we hardly saw the towers and the sky was covered in thick clouds. And then, we got a reward after the trek:

We stayed as long as we could, literally running back to the camp to pack up the tent and leave. We had a bus to catch. Half way down we’ve met many people dressed in the most expensive outdoor clothes carrying their hotel lunch complaining how exhausting the hike is. When we saw the funny scene, we just laughed quickly passing them and glad we took the harder way.
All the people who started the trek at the same time now met at the bus stop. We even met people with whom we crossed the Chile-Argentina border 3 weeks ago.
Shuttle bus came at 1 pm and took us to the entrance of the park where our bus to Puerto Natales was waiting for us. And that was it, the end of our 5 days experience in Torres del Paine. We had a great time in the mountains with all kinds of weather and new stories to share.
Our sadness of returning back to the civilization changed into excitement for real bed and big dinner. The grilled salmon at restaurant El Bote was the most delicious I’ve ever had. We’ve met with our new friends from the trek to plan a biking trip the next day to nearby caves. Although we didn’t make it to Cueva del Milodon because of insanely strong winds, it would be a nice day trip after the trek.
Are you ready to have your own adventure?
Awesome, here is everything you need to know:
How to visit Torres del Paine – basic info
W trek is the most popular trek in Patagonia. Why is it called the “W”? As you can see from the map below, the trail forms a letter W. It covers around 80km with quite a steady elevation, the highest point is Torres lookout at 900m above sea level. The most uphill parts are trekking to Grey glacier in the beginning and to Torres camping zone and look out at the end.
Let me tell you the most important thing – everybody can do it! I mean it. We’ve met trekkers with different fitness levels from 15 year old teenagers with parents to 60+ year old couples. All of us did the W trek; the only difference was the way we chose to do it. There are several options:
- Trek and camp along the way setting up your own tent and cooking for yourself (that’s what we did)
- Rent the tent and sleeping bags at the campsite (already setup for you), eat at the refugios and carry only your clothes and snacks
- Stay and eat at refugios (huts) and carry only a small backpack with your clothes and snacks
You don’t need a guide and you also don’t need a map. The trail is marked, well-trodden and busy. I wouldn’t call this a backcountry and here is why: you encounter a lot of people along the way both newbies and experienced in trekking, there are 5 (paid) lodges along the trail, all of which have normal beds in the lodge, restaurant, electricity, hot showers and sometimes even internet or a hot tub.
That, of course, doesn’t mean to be reckless. Injuries can happen anywhere. Stay on the safe side and don’t forget to buy travel insurance.
You can also buy some food in lodges – pasta (2000 CLP), sauces, juice, beer, chocolate bars (Twix 1000 CLP, Snickers 2000 CLP), cookies and a gas can. Prices are higher than in Puerto Natales, but saving on the weight of food and strain on your back is more important than saving a few pesos/dollars.
The trail gets very crowded as the number of visitors is rising every year. The season runs from September 15th to April 30 (depending on weather and dates might change every year) and the busiest time for the park is December to February.
If you are inexperienced and new to trekking, visit the daily free seminar at Erratic Rock in Puerto Natales. Experienced trekkers talk about all the options you have and will be able to answer all your questions.
READ MORE
Interesting facts about Chile

Best time to visit – Torres del Paine National Park is open year-round but campsites and refugios dictate the season for trekking. The best time to visit is different for everyone. The most stable sunny weather, 15 hours daylight, and biggest crowds are from December to March. Colder nights but fewer people are at the beginning of the season or at the end.
If you’re planning to come during between December and March, it’s recommended to book camps well in advance, also a hostel, gear (if you are renting) and expect crowds on the trail. From our experience, trekking in April was a perfect time. We arrived in Puerto Natales, got a great deal on the hostel, booked all the camps last-minute and didn’t experience crowds while trekking.
READ NEXT
Best time to visit Patagonia
Trekking the circuit or the “O” trek – if you would like to stay longer in the park, add 2 or 3 days and you can trek the whole circuit. The O trek has fewer people (limit of 80 people per day), is almost flat the first two days and on the third day, you’ll go through the highest point of the circuit, John Gardner Pass at 1200m above sea level.
Some people say to trek the full circuit in order to avoid the crowds. But you are only 2 or 3 days trekking the backside and then joining the W trek. Even though there is a limit of 80 people allowed on the circuit trek per day, that is still a big number. When we did the W trek in April, there were hardly 40 people in the campsites.
We chose the shorter W trek because you see there the most beautiful parts and because it’s easier on the back since you carry less food.
Torres del Paine map
(click on the map to enlarge)

photo credit: www.parquetorresdelpaine.cl
How to get to Torres del Paine
To Puerto Natales
Puerto Natales is the main hub of Torres del Paine National Park where travelers start their trip to the park. It has many outdoor shops, accommodation options, and restaurants. You’ll stay in this town before and after the trek. We were staying at W circuit hostel where we also left all our stuff we didn’t need for the trek.
International flights go to Santiago but that is still very far from Torres del Paine. You will need to take another plane going south. The easiest way is to fly to Punta Arenas, a big city south from Puerto Natales. There is a direct bus from Punta Arenas airport to Puerto Natales with a company Bus Sur. It has 7 departures a day, costs 10 USD one way and takes about 3 hours. You can easily purchase the ticket on their website.
From El Calafate or El Chalten in Argentina – bus from El Chalten has a stopover in El Calafate. From El Calafate, it takes 5 hours and costs 30USD. Several bus companies sell tickets at the El Chalten bus station, bus from El Calafate is available online from Bus Sur.
Tip: If you’re coming from Argentina, make sure to discard or eat all the fruit, vegetable and any animal products you might be carrying. They are not allowed to bring to Chile and border control officials often check the bags.
To Torres del Paine
Many companies at the bus station sell tickets to the park. One on them is already mentioned Bus Sur, other include Bus Gomez, Buses Fernandez, Buses Pacheco and Maria Jose Buses (which are the most expensive and not very popular). You can either buy your ticket at the bus station or at the Erratic Rock Hostel in town.
They all cost about 15.000CLP/23USD for round trip ticket. (Return has an open date – whichever day you get back from the trek, you can use the ticket from the same bus company to get to Puerto Natales.) Buses leave from the bus station in Puerto Natales at 7:15 or 7:30 am and arrive at the park entrance at Laguna Amarga at 9:45 am. It takes another 30 minutes to get to Pudeto, from where the boat departs to the start of the W trek. (Boat leaves at 11 am, with increased departures in high season and costs 18.000CLP/28USD per person)
On the way back, a shuttle bus (not possible to book in advance) for 3.000CLP/5USD leaves from Las Torres hotel back to Laguna Amarga. Bus drivers wait for the shuttle bus to arrive and then take you back to Puerto Natales.
Torres del Paine weather and trail conditions
When asking about the weather in Patagonia, and Torres del Paine especially, you’re not going to get a straight answer. The park goes through 4 seasons but weather changes so quickly that you can have all seasons in one day or a few days like we did. Expect strong winds, rain, snow, and sunshine. You shouldn’t rely on the forecast and come prepared for all seasons no matter when you visit.
When we did the W trek in April, the first day was sunny and hot, the second day was cloudy with both rain and occasional sun, the third day was raining all day, we had snow on the fourth and our trek finished on a sunny day.
The wind
It might knock you down, no kidding. Patagonian winds are notoriously strong and fortunately for us, we experienced them later on. Not in Torres del Paine while carrying a big backpack. You should consider using hiking poles to help you keep stability. If you do any sports and have strong legs, you should be fine without them, we were anyway.
Tents and the wind
Believe it or not, the wind can break your tent. You need a good tent with aluminum poles. The cheap ones usually have plastic poles which are too easy to break. We’ve heard of people whose tent collapsed, the wind picked it up with sleeping bags inside and threw it few meters away.
You have three options: you can buy a good tent, you can rent a tent in Puerto Natales or you can rent a tent in advance in a camp that will be already setup for you (they go like hot bagels in the high season and are available in paid camps only).
When you’re going to pitch your tent, always try to find a forest, a tree, bushes or anything else that can break the wind. Do not set up the tent in the open area. You’re safer next to any kind of wind breaker and much warmer, too. A lot of camps have a campsite in the forest, wherever we could, we pitched the tent under the trees. It’s less windy and the trees keep the warmth, too.

Trails
Trails in Torres del Paine are well-trodden and every junction is clearly marked. I can confidently say it’s impossible to get lost on the W trek unless you go off the trail which is strictly forbidden. Hiking is only allowed on the marked trails.
Park is enforcing it and can kick you out if you don’t obey their rules. Hiking off the trails and wild camping is prohibited, period. As the park is seeing more and more visitors every year, you can understand why they are trying to protect the area.
Trails are well maintained, you will often hike on the gravel or dirt and in some cases, mud. Or as you could see in our case, ankle deep mud. Try to find a drier area around it or just go your normal pace straight through. If you don’t spend too much time in one spot, you shouldn’t sink deeper which is always a good thing. Your boots will get muddy but your feet will stay dry.
Wearing waterproof hiking boots with good grip and ankle support is essential in these tricky areas. I recommend these hiking boots; they never failed me and kept me safe and warm from Peruvian Andes to Chilean Patagonia.
Keep in mind there are trail closing times. If you’re past the cut-off time for a particular section of the trail, park ranger won’t let you go further. It is to prevent wild camping and to ensure everyone’s safety.
Cost of the Torres del Paine W trek
Costs will defer depending on the option of trekking you choose. We stayed 2 nights at free campsites (Italiano and Torres) and 2 nights at paid campsites (Grey Glacier and Frances), brought all the food from Puerto Natales, cooked for ourselves and didn’t rent any gear. If you’re planning to do the W trek on a budget like we did, these will be your costs per person:
Bus from Puerto Natales to Torres del Paine National Park (roundtrip ticket) – 15,000 CLP (23 USD) with Bus Gomez
Entrance fee to the park – 21,000 CLP (33 USD)
Boat from Podeto to Paine Grande ranger station, the beginning of the W trek – 18,000 CLP (28 USD)
Grey Glacier campsite – 5,000 CLP (8 USD)
Frances campsite – 10,000 CLP (16 USD)
Shuttle bus from Las Torres hotel to the entrance of the park – 3,000 CLP (5 USD)
Food for 5 days – 21,000 CLP (33 USD)
The whole 5 day W trek cost 93,000 CLP = 144 USD per person
Camping Torres del Paine
Camping is a great option for experienced hikers or people that want to carry all their equipment. We came here prepared with our own gear as we already did some trekking and camping in Patagonia.
Before trying to book the campsites, you need to understand how the park is managed. The park is on public and private land so some campsites belong to private companies and some are public/government-owned. The southwestern part of the park belongs to a private company Fantastico Sur. Rest of the park is owned by the government that rents out some camping sites to another private company Vertice. To make it even more complicated some of the campgrounds are owned and managed by CONAF (Chilean government organization protecting forests).
We scheduled our trek for four nights and five trekking days. Our route was Grey Camping – Italiano camping – Frances camping – Base Torres camping.
Whichever trek you chose, you will have to deal with at least two of those organizations but quite often all three. Here are the camping sites from west to east so you can see which campsites belong to which organization (prices are below the map per person for season 2017/2018; don’t worry about the exchange rate, if you are a foreigner and booking online you will need to pay in USD):

photo credit: www.parquetorresdelpaine.cl
Grey – Vertice – 5000 CLP (8USD)
Paine Grande – Vertice 6000 CLP (10USD)
Italiano – CONAF free
Frances – Fantastico Sur, 10000 CLP (21USD)
Los Cuernos – Fantastico Sur, 48000 CLP (97USD) with mandatory full board
Chileno – Fantastico Sur, 54000 CLP (113USD) with mandatory full board
Las Torres (central) – Fantastico Sur, 54000 CLP (101USD) with mandatory full board
Base of Torres – CONAF (CLOSED IN 2017-2018 SEASON)
To book your campsite on the trek you have to visit websites of companies managing particular campsites. There is no possibility to do it at once.
Since 2017, when you enter the park and plan to go trekking, you have to have all of your campsites booked. If you couldn’t book one of the campsites and you have a night without a reservation, park rangers might not let you on the trail.
Plan your route depending on your experience and fitness level. There are several options how you can do the trek, from 3 days up to 7 days. The below explains what to know about the campsites and how to book them.
CONAF campsites are basic wilderness campsites. They have outhouses and water you get from the stream. There are no showers but if you need you can wash down the stream in the river. The kitchen is only simple shelter with three walls so it can be cold in the evenings. These camps are free. Book them in advance on CONAF site.

Vertice campsites are on the meadows or at the edge of the forest. They have running water, hot showers, flush toilets and enclosed cooking area with electricity and light. You may charge your batteries in their sites. They also sell some basic food that is usually double price than in the supermarket. Vertice campsites are a good budget option as well and can be booked online.
Fantastico Sur campsites are more developed and also most expensive. You will set up your tent on a leveled timber platform. They have hot water showers and flushable toilets. No need to go to the river to get water, it’s running through the pipes in the sheltered cooking area. There is electricity to charge your phone/batteries and also a ridiculous thing – you can buy internet connection.
When you’re crossing their land, you need to book with them, there is no other option. They also take advantage of it as three of the most important campsites (closest to the Torres lookout) are only available with full board. Check availability and reserve on their site.
Once you know your trek schedule, check availability online. Don’t book anything before you confirm all sites availability. As CONAF closed the most important campsite at the Base of Torres for maintenance, now your trek will be more expensive by at least 100 USD because you will need to stay at one of the Fantastico Sur campsites. If you come at the beginning or end of the season you can book your camping in person at their offices.
Important note while camping: Don’t forget to wash your cooking dishes away from the stream as people might get sick from the waste water.

Refugios Torres del Paine
Every paid camping zone in southern part of Torres del Paine offers an option for renting a tent and a sleeping bag. Also, each of these zones has one or more buildings called refugios (huts).
Reserving refugios as your overnight stay is either a good break in case of bad weather or an option for hikers that don’t have the fitness level, experience, or have a medical condition that doesn’t allow them to carry a heavy backpack or can simply afford it.
Vertice and Fantastico Sur offer to stay at refugios and have a lot of options how to decrease your suffering. If you want to enjoy camping atmosphere but doesn’t want to carry tent or sleeping bag you can rent a tent on-site. Every company has tents for rent. Prices vary by companies. Total price can be from 330 to 440USD per person for the whole trek.
If you don’t want to sleep outside but still cook your own food, there is also a possibility to do it this way. Every refugio offer beds with or without a sleeping bag. All you need to do is carry your clothes and food. Prices for staying in refugios and cooking with some of your own food are between 415 to 650USD.
If you like everything arranged, chose the option with bed and full board. This option is the most expensive but also you don’t have to worry about anything. You carry your clothes and camera. You will enjoy the trek and avoid potential bad weather inside a warm hut. This options would cost you anywhere from 590 to 750USD.
Suggested 4-day route for the W trek
You can choose whichever starting point you like, either starting at Paine Grande and go west to east or start at Las Torres hotel and go east to west.
We suggest you trek west to east. That way you will see the sunrise at the Torres towers at the end, a nice finish and reward after the trek.
1st day: Catch the soonest bus from Puerto Natales so you will be among first at the park entrance to pay the entrance fee. The bus will then take you to Pudeto. There are several boats departing to Paine Grande Lodge, the sooner you can board one the better.
Let me tell you why. Book the campsite at Paine Grande for the first night, setup your tent (or leave it for later) and leave your big backpack in the camp. Pack your lunch, camera and rain gear and hike beyond the Grey Glacier ranger station to the suspension bridge and back the same day. It’s a doable 27 km round trip to the suspension bridge and back to camp and the most important of all – you’ll be hiking with only a small daypack.

Because we visited at the end of the season, there was only 1 boat a day and it arrived at noon to the Paine Grande Lodge. We had around 6-7 hours of daylight left and we would be returning in the dark. It took us 4 hours one way to the suspension bridge because we were carrying our big backpacks which were at their heaviest the first day.
READ NEXT
Chile itinerary for 2 weeks & adventure travel guide to backpacking Chile
2nd day: From Paine Grande, you’ll continue to Italiano ranger station and camping zone where you can either stay for the night or continue a few more km to Frances camping zone. Either way, leave the backpack at Italiano and hike the Frances Valley to Britanico, an easy slightly uphill 10 km round trip (trail all the way to Britanico lookout is closed for trekkers, only available with special permission from the park).
3rd day: Starting from Italiano or Frances camping zone, continue to the Torres ranger station and camping zone. You can stay at Chileno Lodge and camping zone. Your cost for camping will increase, even though you want to stay at Chileno campsite and cook yourself, you’ll have to pay for the food they provide.
4th day: Check before when the sun rises so you have enough time to get to the Torres lookout to see the sunrise. You can see the Torres towers during the daylight and they will be equally spectacular. It takes 45 minutes from Torres campsite to the Torres lookout, add another 1,5h if you’re coming from Chileno.
Enjoy the beautiful view and then head back to the Las Torres hotel to catch the shuttle for Laguna Amarga/national park entrance. From there, the bus that took you to the park will drive you back to Puerto Natales (make sure you don’t lose the bus ticket during the trek).
If we were to do the W trek again, we would choose this option. Since it’s only 4 days and you’re carrying food for only 3 days (full board in Chileno is mandatory while camping), the weight of the backpack goes down significantly. That means more enjoyable trek and carrying less weight.
*In the spirit of full disclosure: Some links in this post are affiliate links, which means that if you purchase through them, we receive a small commission at no extra cost to you. We appreciate your support!
Read more about Chile
If you have any question about the trek we haven’t covered, let us know in the comments below and we’ll do our best to help you plan your Torres del Paine adventure.
Spread the word! PIN this to your Pinterest board.


Currently the top thing on my bucket list. The price scares me a little bit but wow, your pictures make it look so so so worth it.
That’s awesome, Eli! I’m not sure which price you saw but 144 USD for a 5 day trek sounds very good to me.
hey hey,
thanks for much for all the details, really enjoyed reading through this!
I was wondering if it was quite crowdy on a W trek when you went? how many people in a day would you usually come across?
Luckily we didn’t visit during high season but we still met around 200 people on the 1st and last day where day-trippers go, and then around 50 a day.
Beautiful write on a beautiful trek!
Can you give websites where I can reserve the full service refugios for the full circuit, W and O treks? I would prefer staying in warm hut and eating hot food I do not have to cook.