Iceline Trail is a breathtaking hike in Yoho National Park featuring views of Takakkaw Falls (the 2nd highest waterfall in Canada), up-close and distant glaciers, several other waterfalls and pristine lakes.
We’ve been to Yoho National Park and even seen Takakkaw Falls several times. But it wasn’t until last summer that we went truly beyond the well-known path and discovered what, in my eyes, is one of the most stunning hikes in the Canadian Rockies.
The fact that it starts and ends at Takakkaw Falls with magnificent views and picnic tables gave us some extra time to appreciate the beauty of these mountains. No wonder this province is commonly known as ‘Beautiful British Columbia.’
While this blog post contains a lot of useful written info and tips, it’s a giant photo gallery of the Iceline Trail. It’s long, but I guarantee it’s worth it!

MORE TIPS
Read our comprehensive Adventure travel guide to Yoho National Park for more activities and tips for visiting.
*In the spirit of full disclosure: This post may contain affiliate links, which means that if you purchase through them, we receive a small commission at no extra cost to you. See more details here. We appreciate your support!
Table of Contents
Pros & cons of the Iceline Trail
Pros:
- Seeing Takakkaw Falls and its feeding glacier from above
- The whole trail is very scenic
- Get up-close to several glaciers
- A lot of distant views of waterfalls and glaciers
- Very few people on the trail
- The trail is passing several different climates
- Plenty of lakes and other waterfalls along the trail
- Option for shorter day-hike or longer multi-day hike
- Option for camping or staying in a hut for a multi-day backpacking trip
- Close by campgrounds to stay before and after the hike
Cons:
- There are none

Where is Iceline Trail & how to get there
Iceline Trail starts at Takakkaw Falls in Yoho National Park, British Columbia at 1,500 meters above sea level.
From the closest town Field in Yoho National Park, it’s about 15 km.
If you’re coming from Calgary, Banff, or Lake Louise, take the Trans-Canada Highway until you see a sign for Takakkaw Falls/Yoho Valley Road. Google Maps won’t show you directions during the road closure (mid-October to mid-June).
The map below shows Takakkaw Falls, where the Iceline Trail starts.
Iceline Trail in Yoho National Park
- Distance: 18.3 km loop via Celeste Lake Trail (the longer loop via Stanley Mitchell Hut/Little Yoho Valley Trail is about 4 km longer)
- Elevation gain: 793 m
- Difficulty: difficult
- Best time to go: mid-June to mid-October (outside these dates the road is closed due to avalanche danger)
- Gear: water bottle with filter (you can fill up from glacier waterfalls), windproof jacket, running/hiking shoes, bear spray
- Tips:
– Parking is only allowed at Takakkaw Falls Trailhead (not along the road or by the hostel)
– There are several backcountry campgrounds and an alpine hut for backpackers
– While we were carrying a Gem Trek map for Lake Louise & Yoho, the whole trail is very well signed and map is not necessary
– The trail might be covered in snow if you go early in the season
Iceline Trail Map
In early September, we drove from Calgary to Yoho National Park to explore the Iceline Trail. The night before the hike, we camped in our Smile Campervan in the Monarch Campground as it’s only a few minute drive to Takakkaw Falls.
Fresh start
When we parked at Takakkaw Falls parking area at 8 am, it was surprisingly empty. Just a few hikers dressed in lots of layers and wearing hats. As usual for autumn in the Rockies, mornings are chilly and mountain air is extremely fresh.

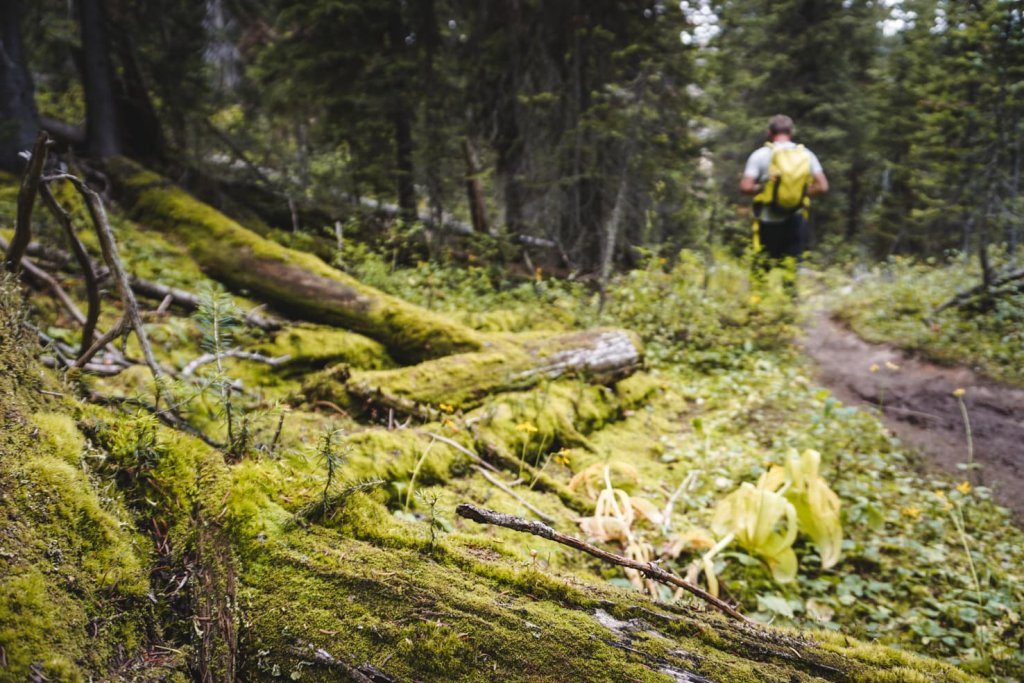
Just as we started walking from the parking lot towards the falls, we saw a big sign of all hiking trails in the area. The Iceline Trail is a loop that can be done in both directions: either starting via Little Yoho Valley or via Whiskey Jack Hostel.
We chose to hike via Whiskey Jack Hostel because the beginning above the hostel is steep, and it’s better for the knees going uphill. We warmed up pretty quickly as well. Finish of the hike is flat, great for relaxing the legs at the end of the day.


When walking towards the Takakkaw Falls, we passed the bridge on the left and continued straight up until the famous red chairs. They are perfectly set up to provide excellent views of Takakkaw Falls.
Right here where the pavement gave way to the dirt trail, the hike continues. Shortly after we crossed the Yoho Valley Road and arrived at Whiskey Jack Hostel, a big sign for Yoho Valley and Bear warning welcomed us.
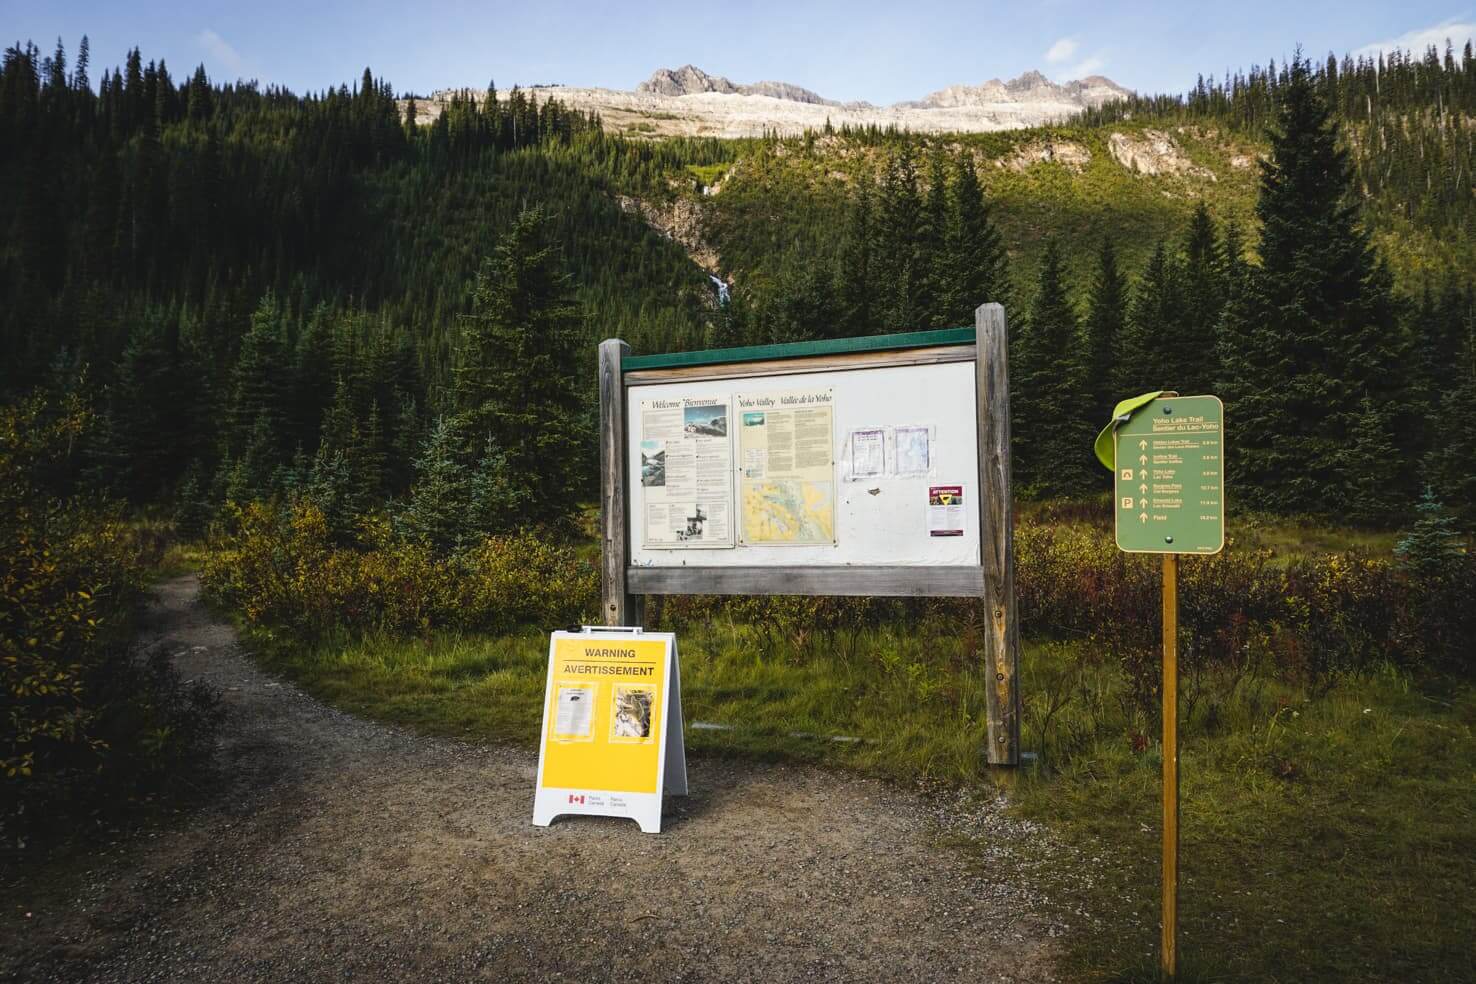
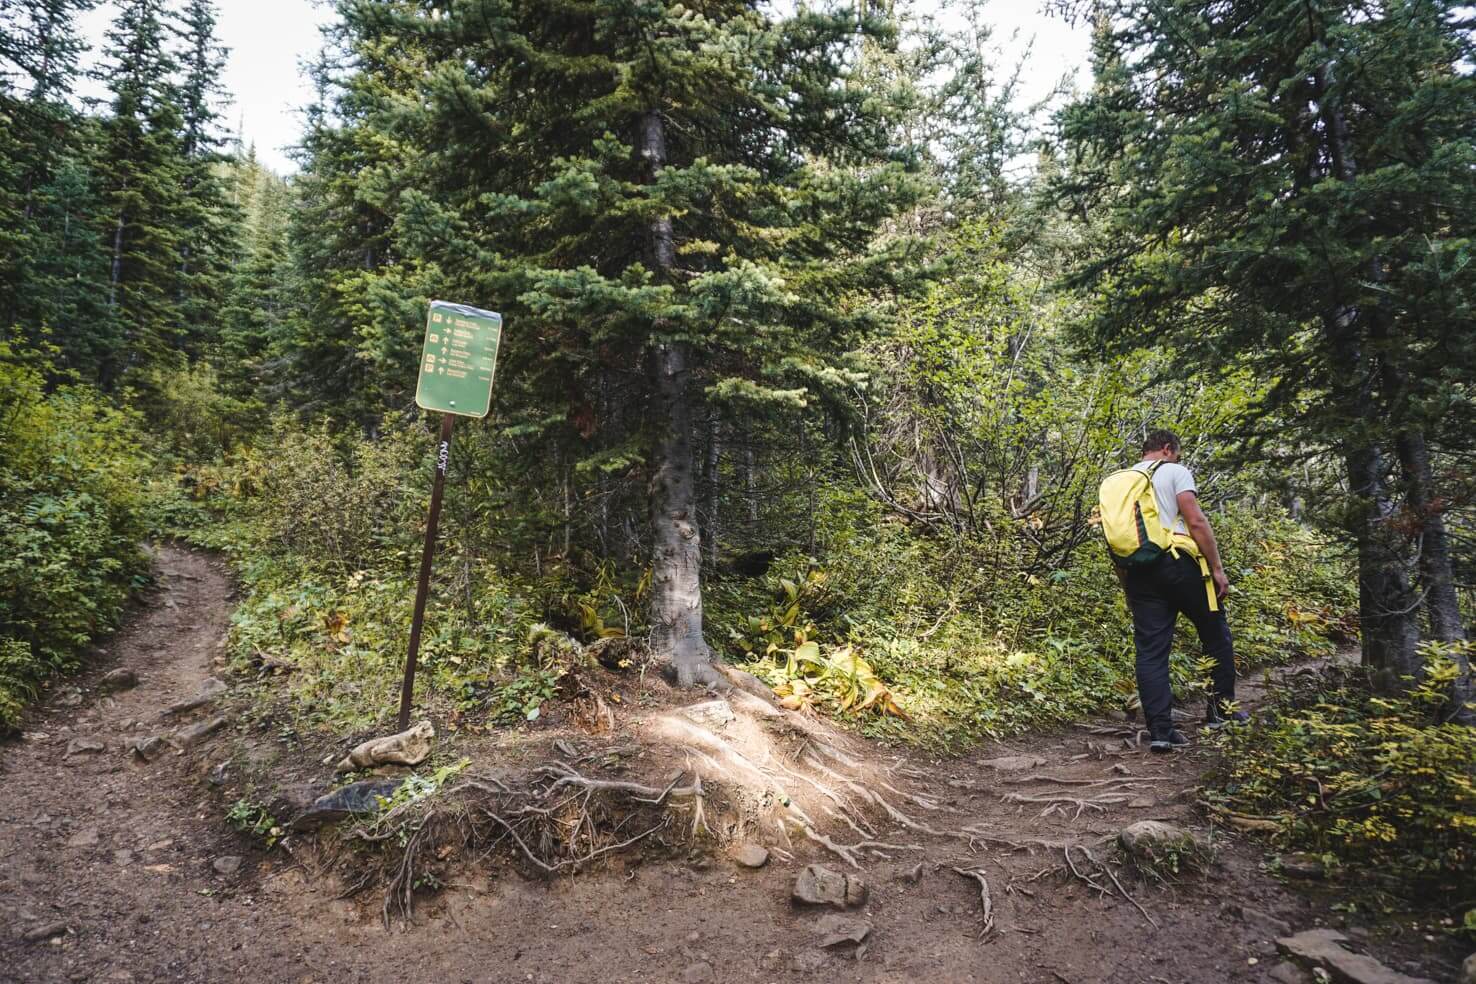
A few hikes start here, including the Yoho Pass Trail which takes you to Emerald Lake. After about one kilometre, a sign points you to the right direction for Iceline Trail (to the right).
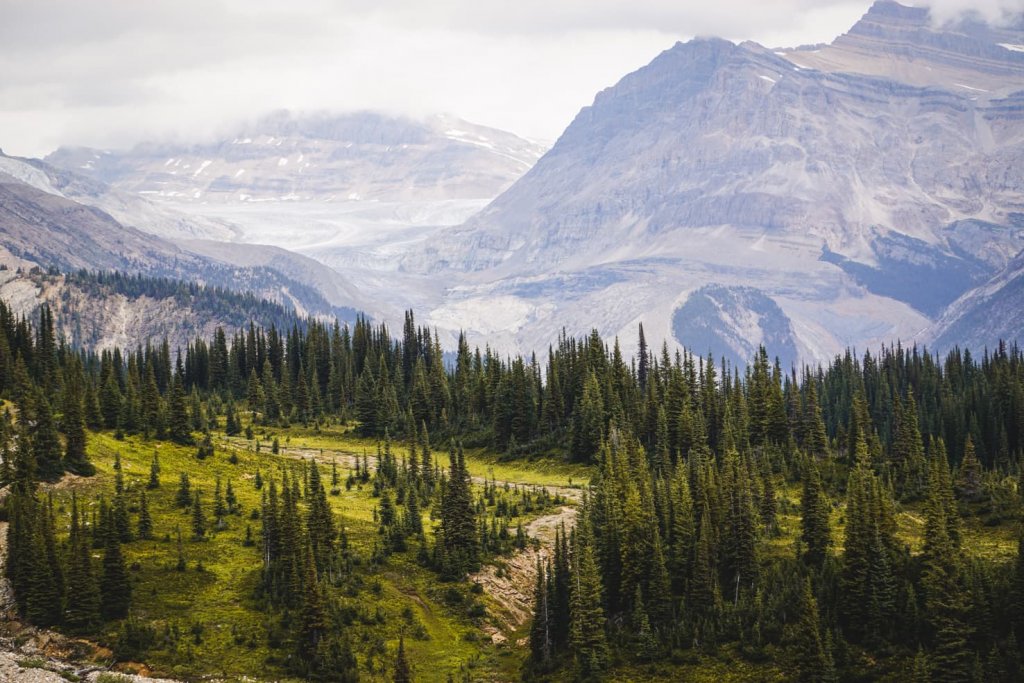
Glacier views in every direction
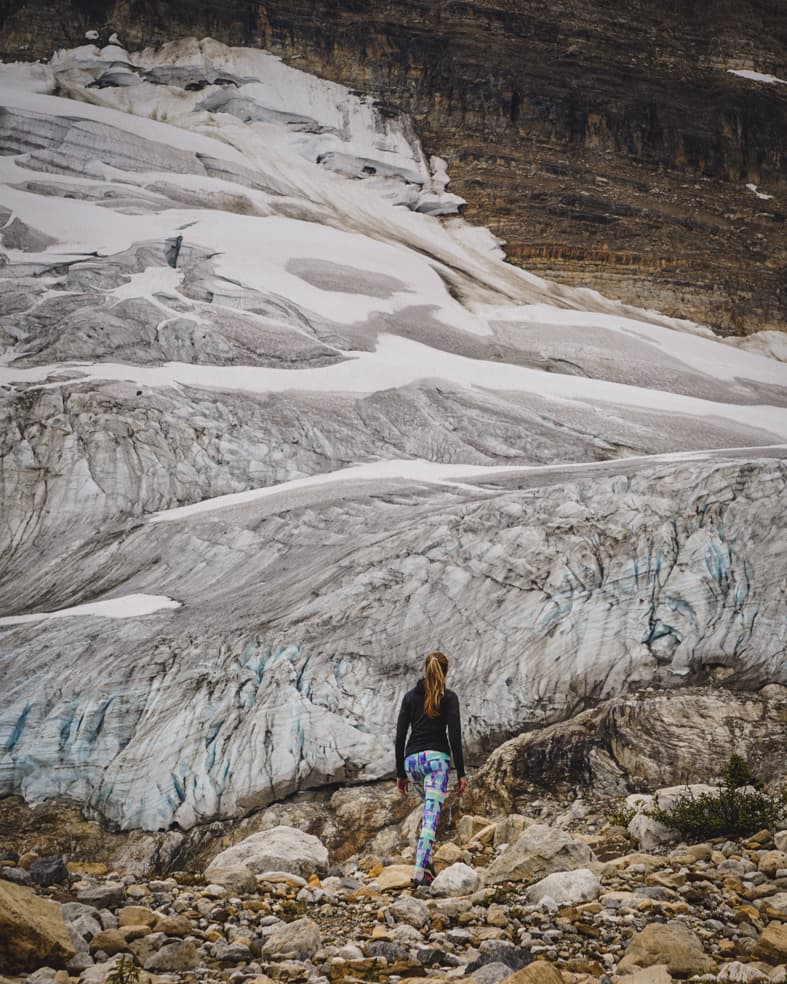
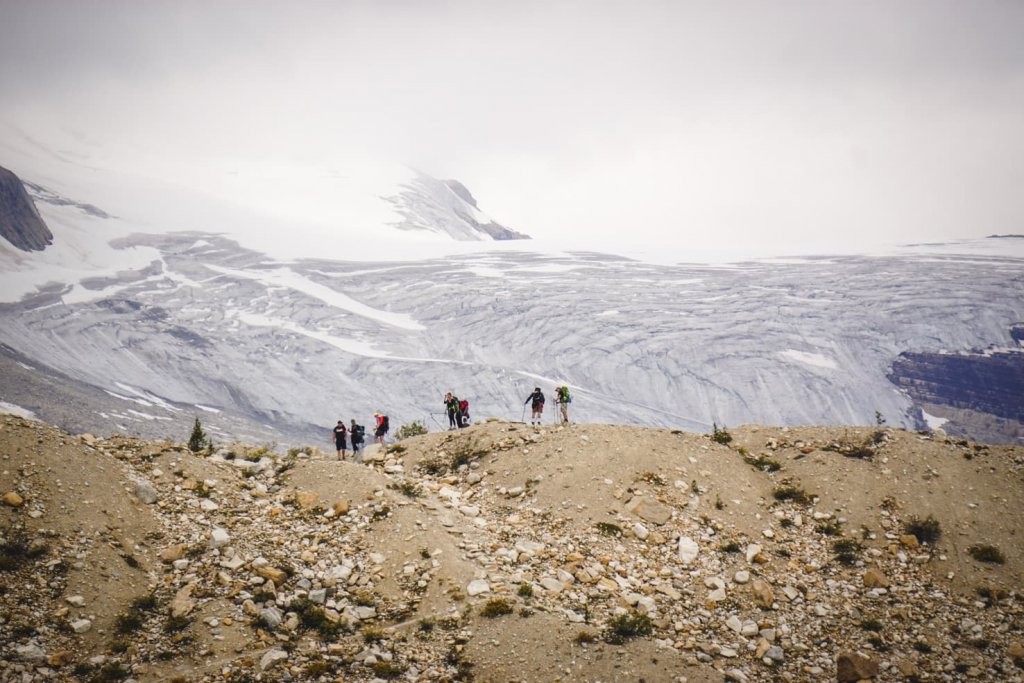
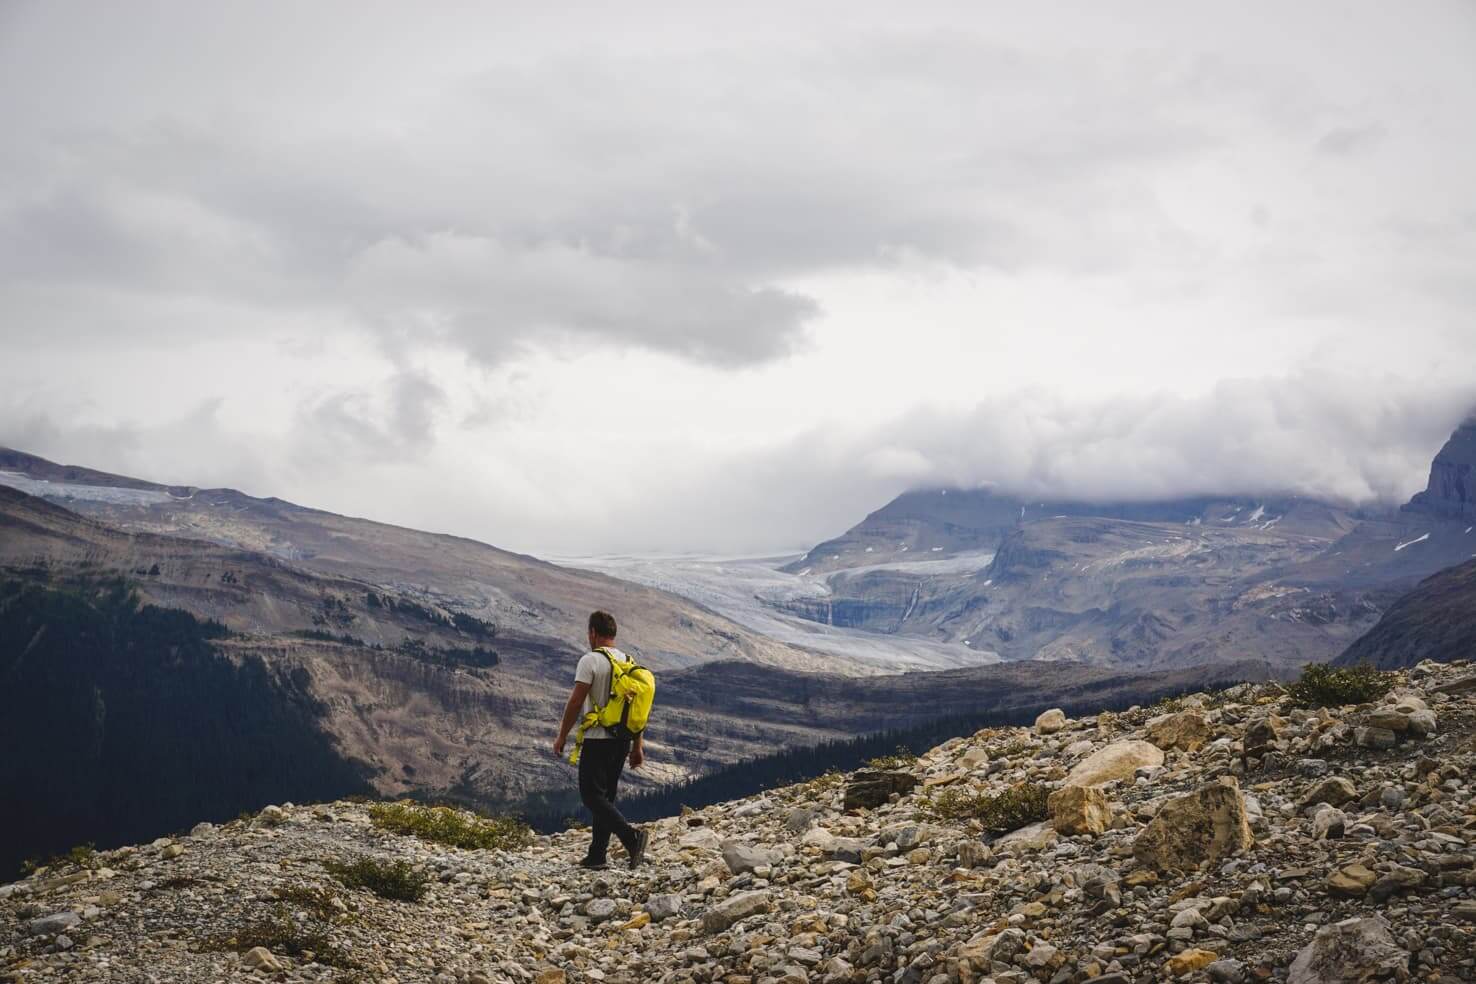
The trail changes to switchbacks and climbs steeply through the trees. As we slowly gained elevation, the view of the Takakkaw Falls opened up a couple of times and we started seeing the glacier feeding the falls.
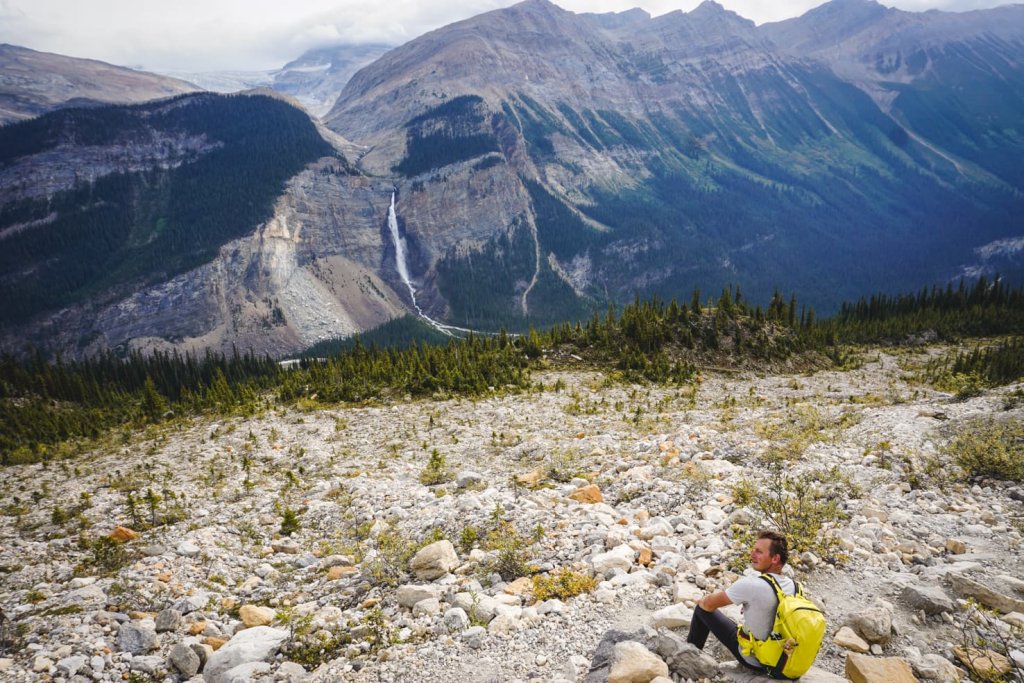
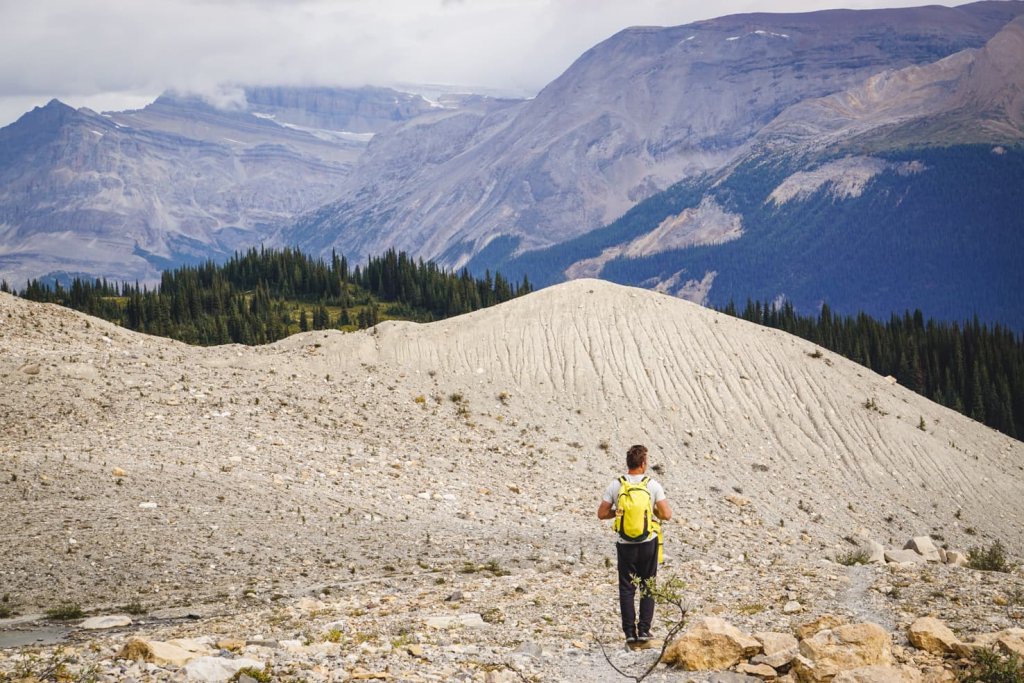
We gained about 500 meters until we climbed above treeline. This was the hardest part of the hike and from now on, there are constant breathtaking views.


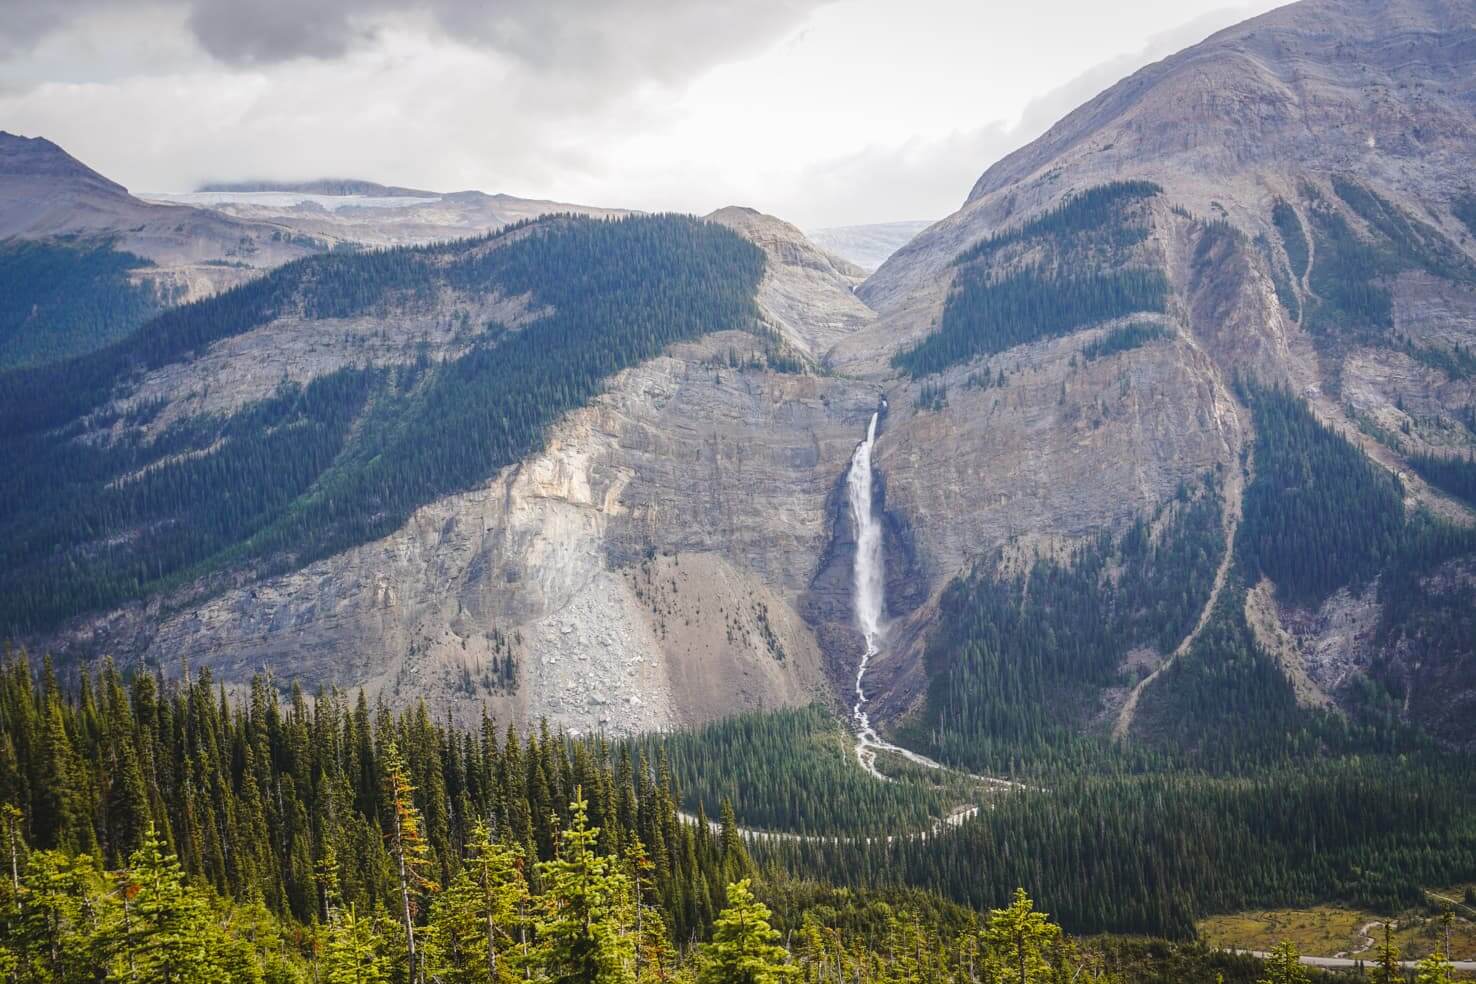

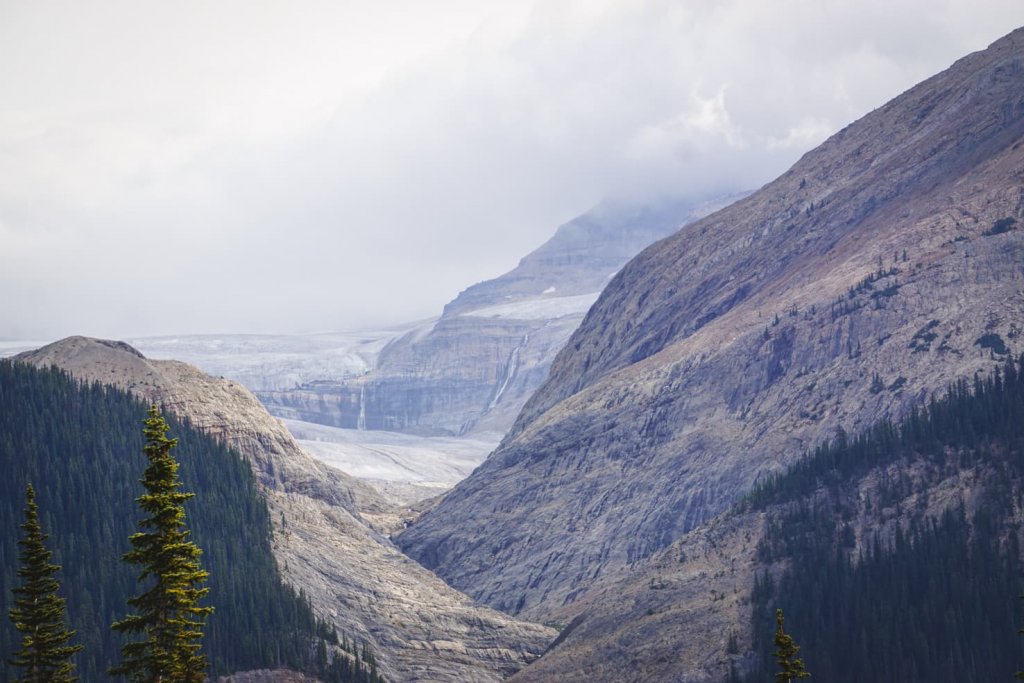
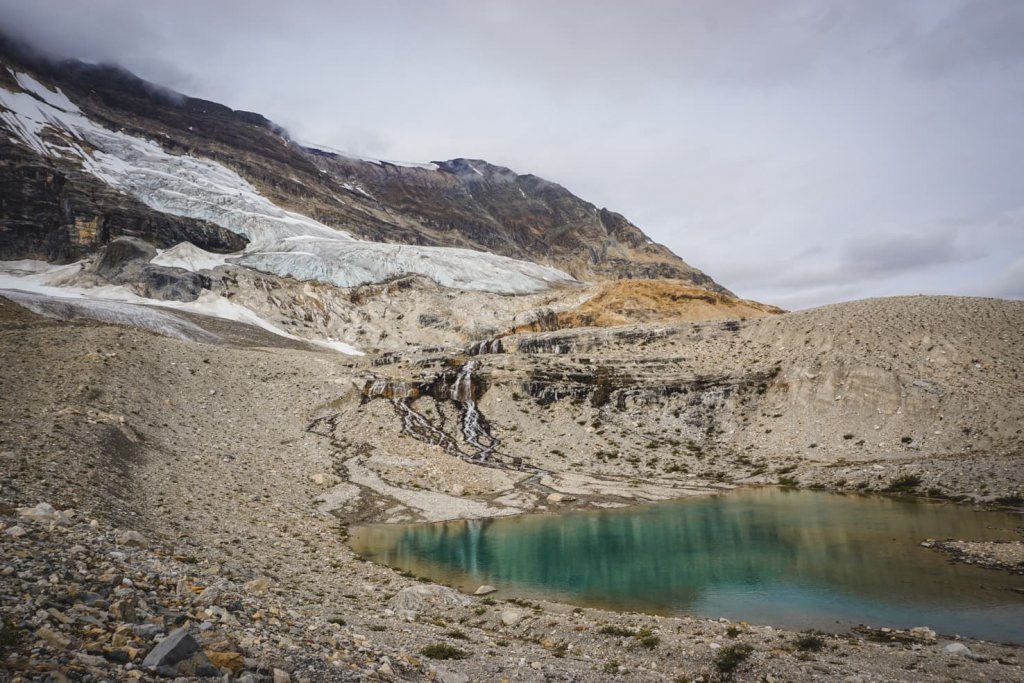
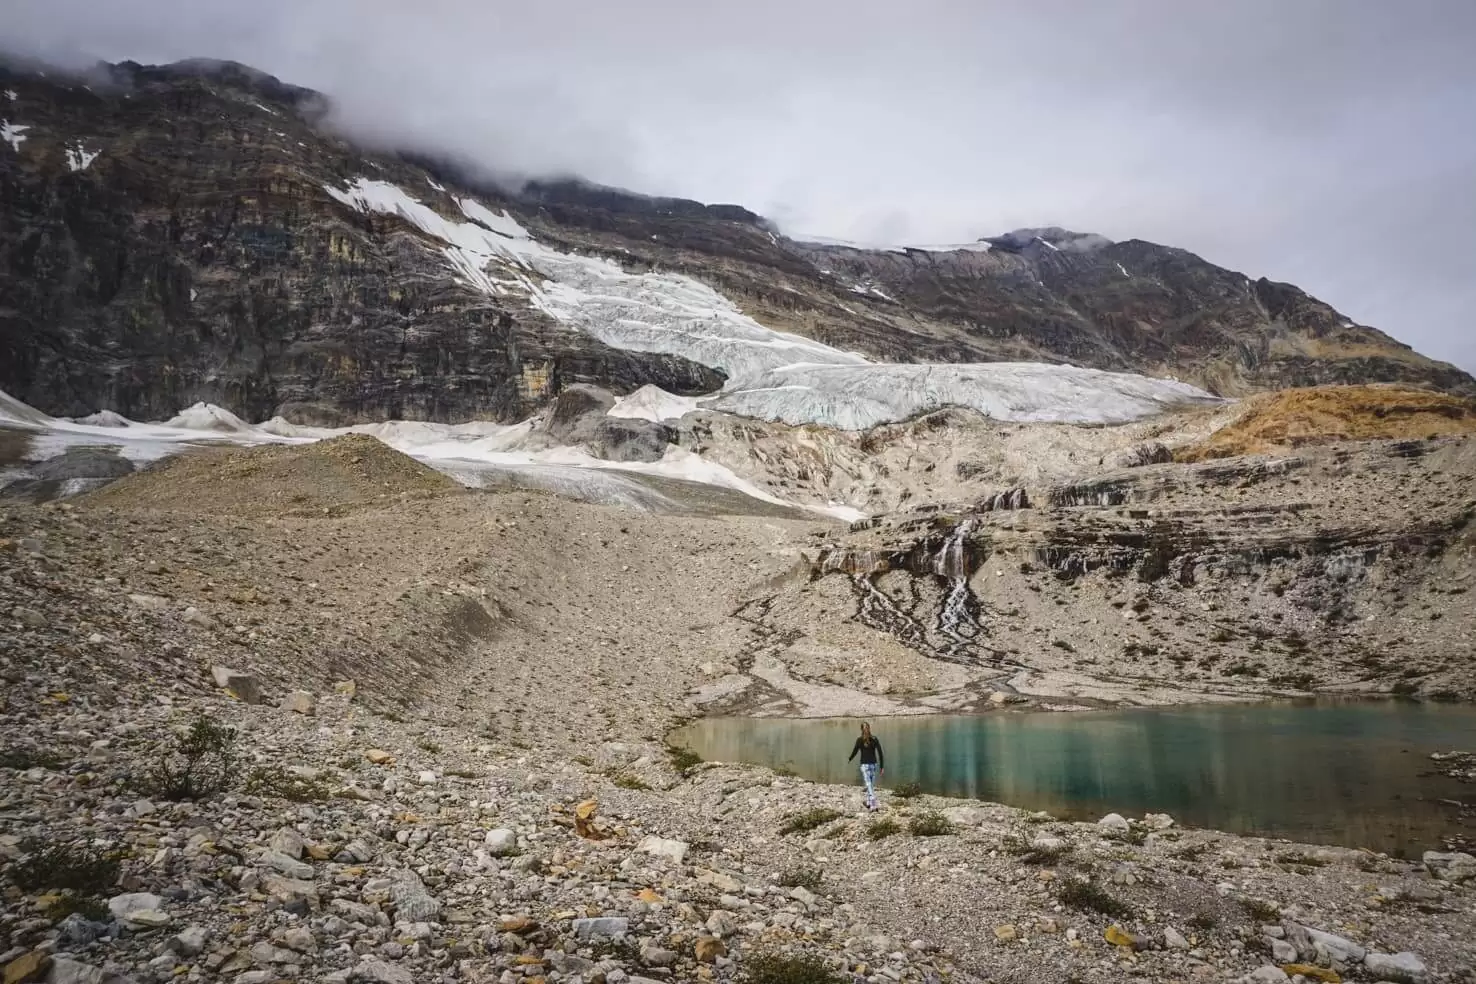
Distant views all around us uncovered several waterfalls and glaciers. The rocky trail is slightly hilly and provides Takakkaw Falls view for the next three kilometres. While they are impressive, the views on the left side of the trail don’t disappoint either. When we left the rocky walls behind, we shortly stumbled upon glacier after a glacier.
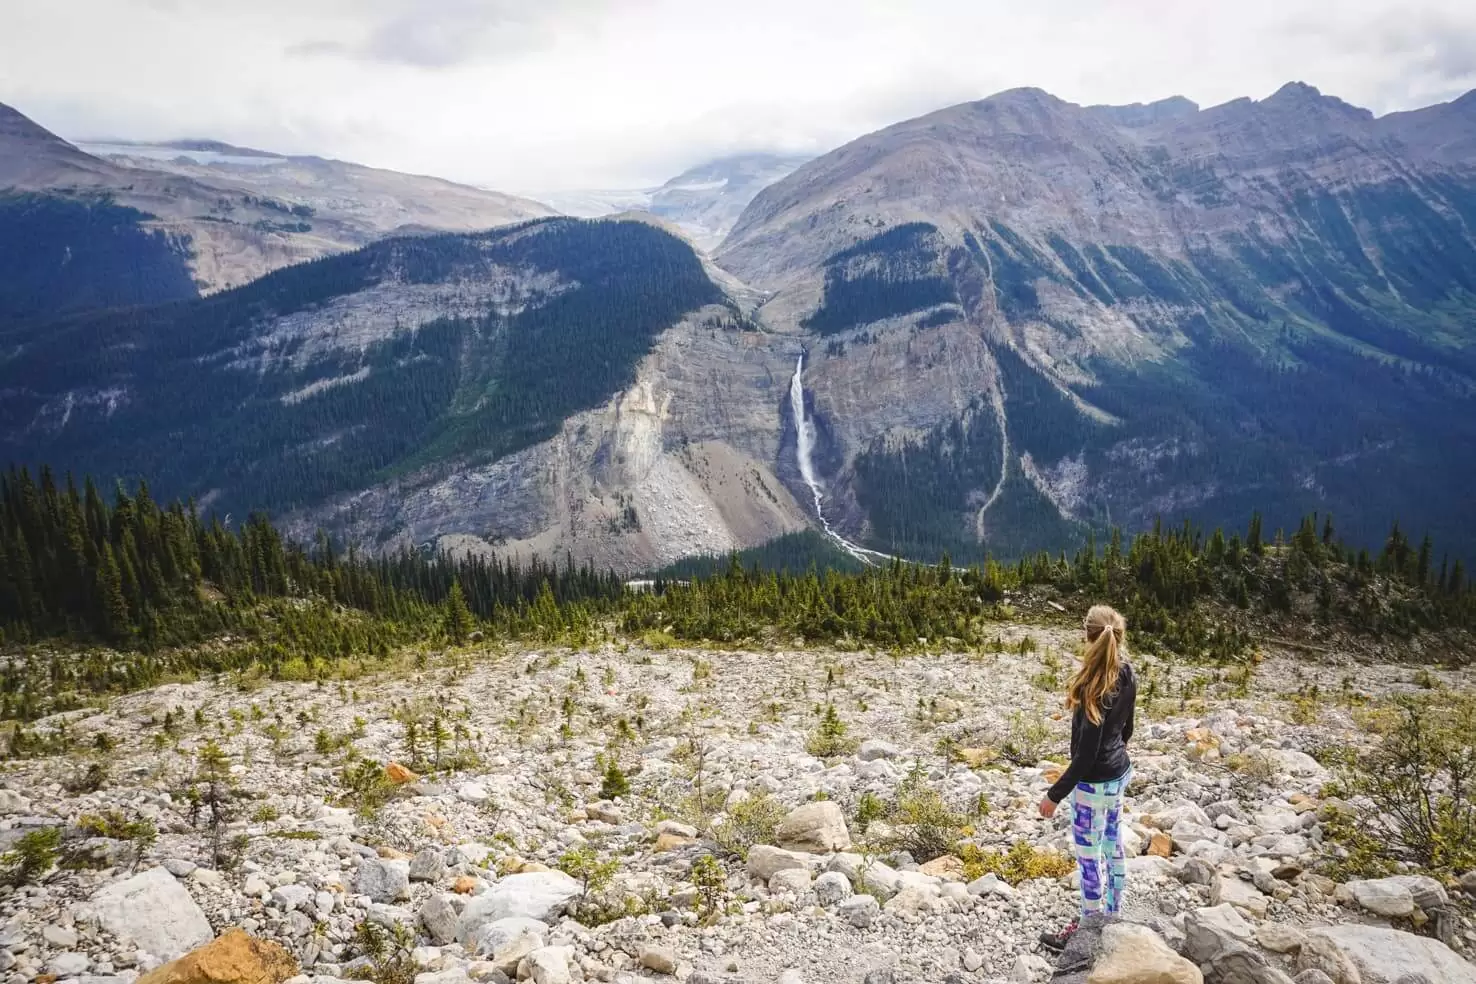


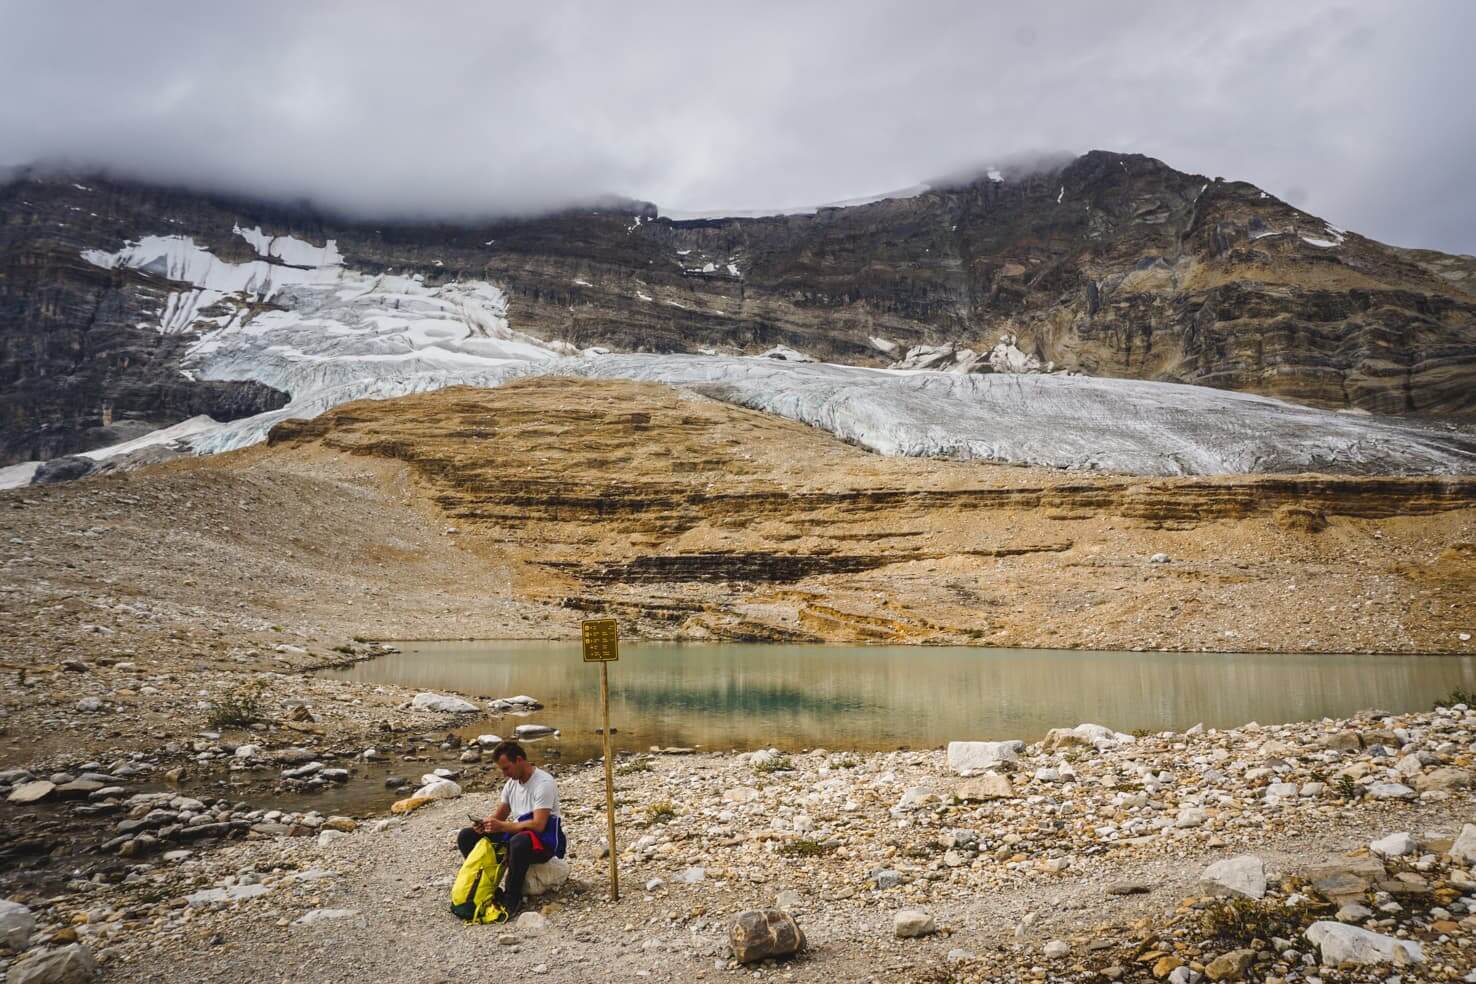
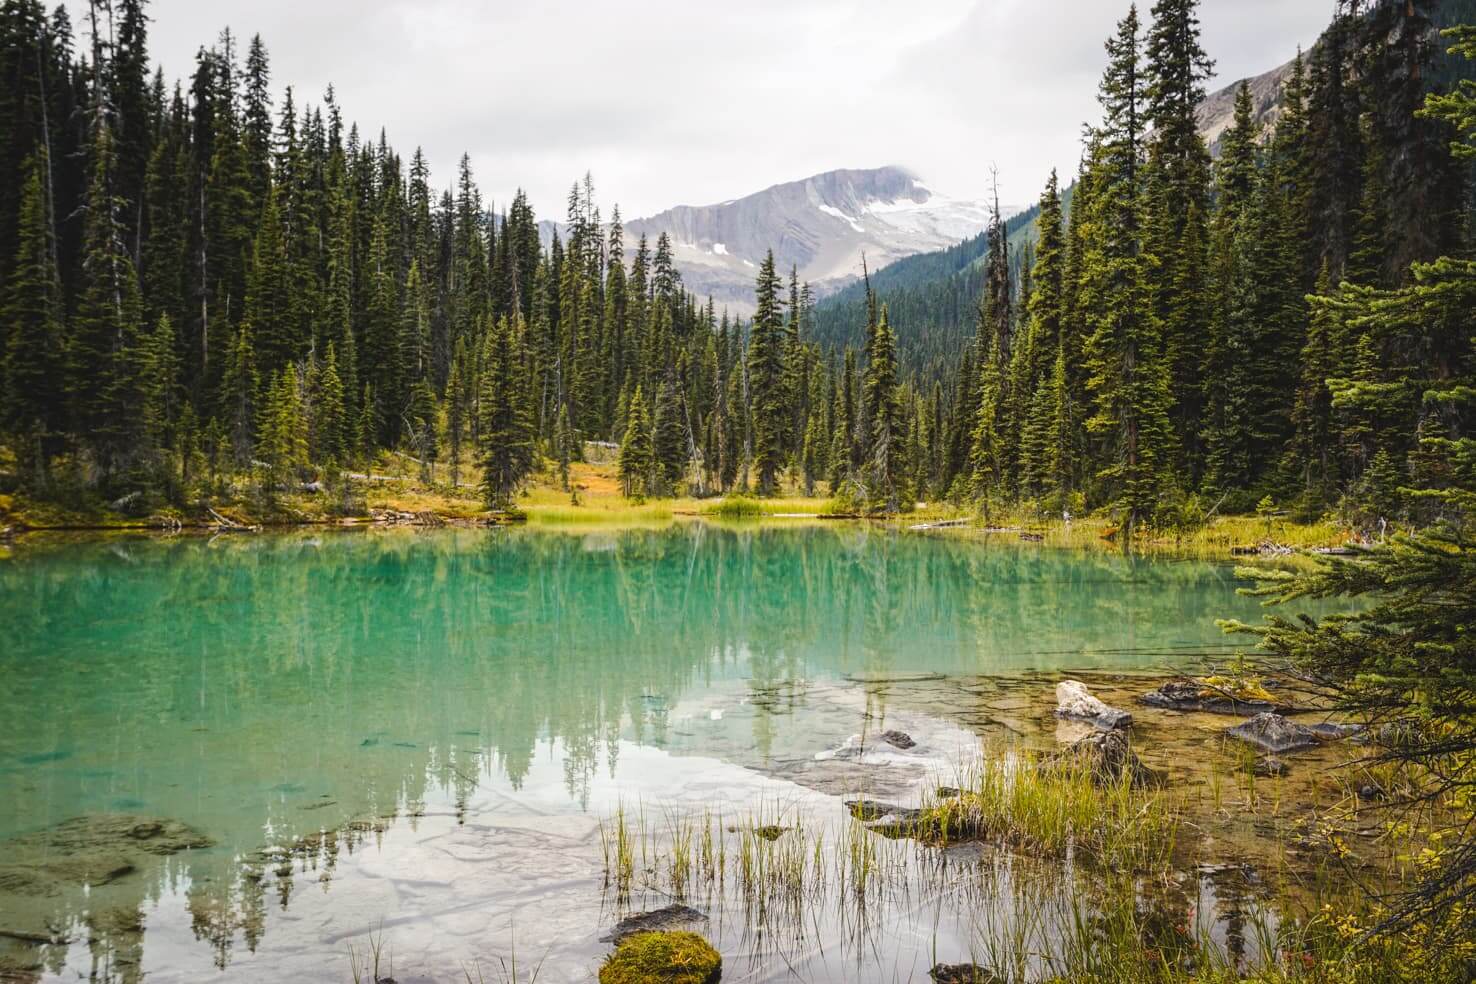
It’s truly beautiful to see the cycle of nature – glacier on top of the mountain becoming a waterfall, which is feeding a mesmerizing emerald lake. Then the lake forms a creek and becomes another waterfall further down the mountain.
When we reached the crossroad by two small lakes marked with a sign, we stopped for lunch. Looking at the uncertain clouds above us, we’ve decided not to continue to Stanley Mitchell Hut/Little Yoho Valley Trail but shorten this day hike and take the Celeste Lake Trail instead (which saved us additional 4 km).


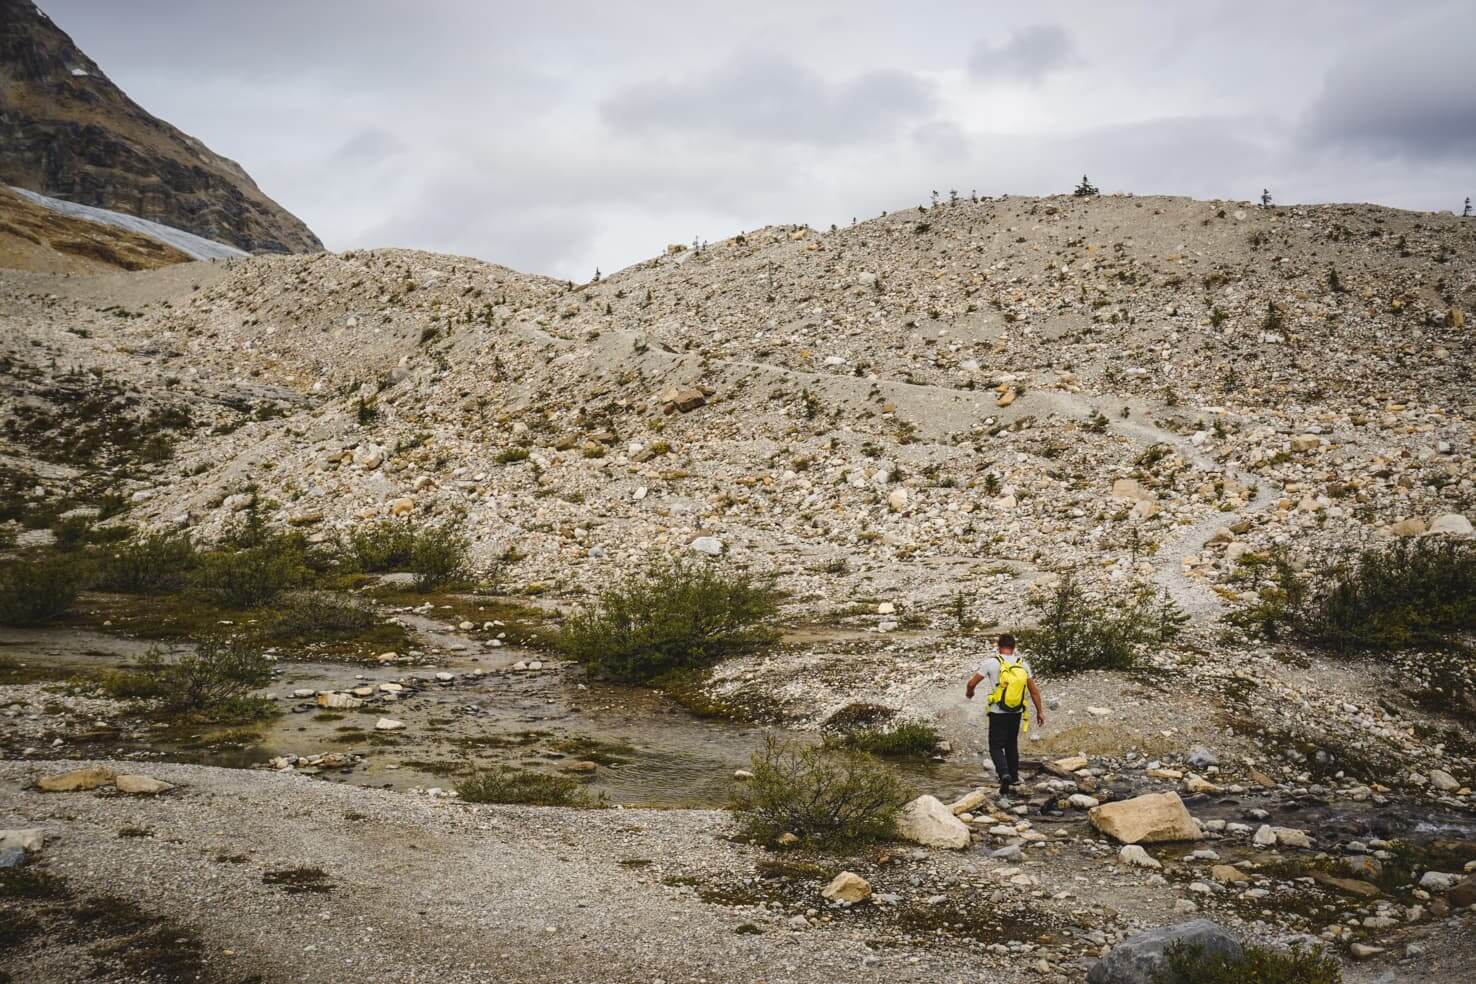


Change of scenery
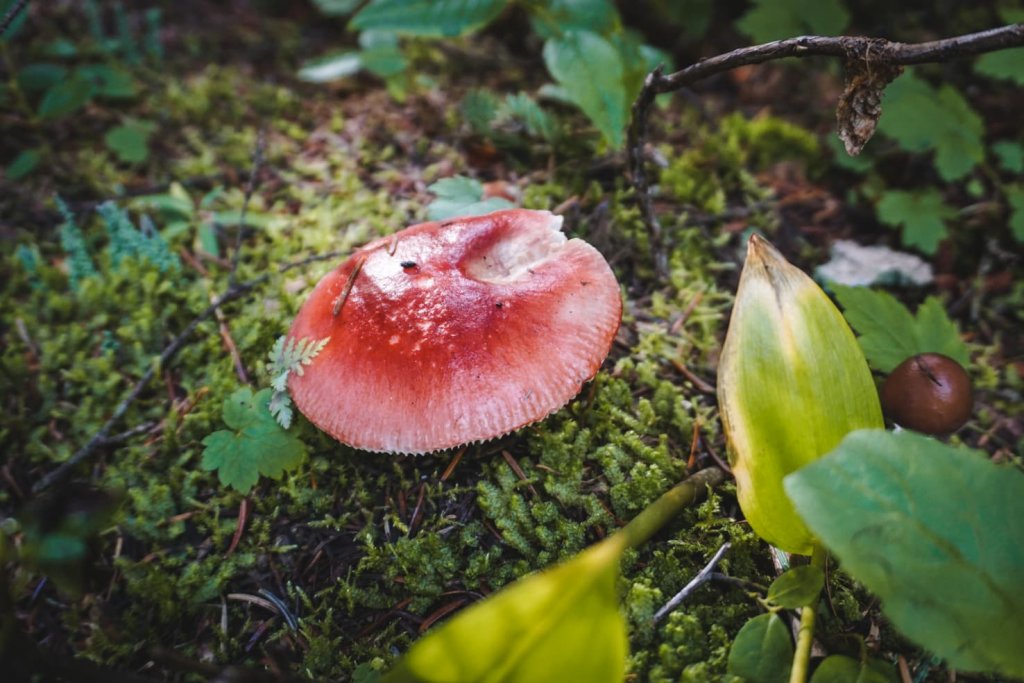
We left the rocky trail and entered a different climate. Suddenly the nature came to life. Lush green forest opened in front of us, grass sprinkled with morning mist and growing mushrooms everywhere. Yoho Glacier in the distance was proudly overlooking it all and keeping us company.


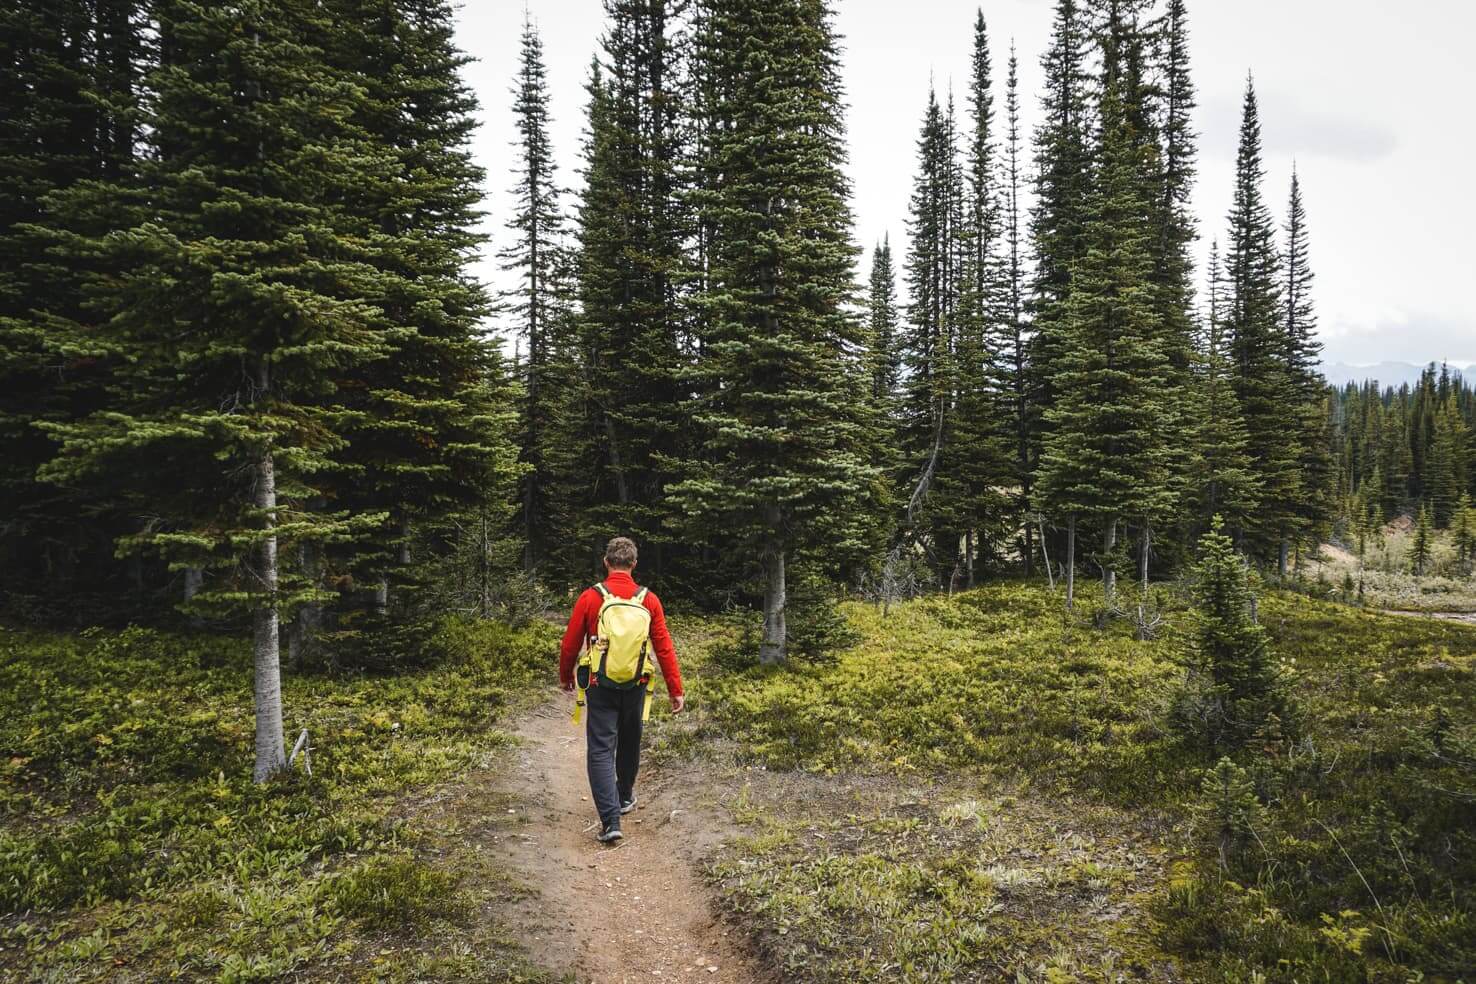
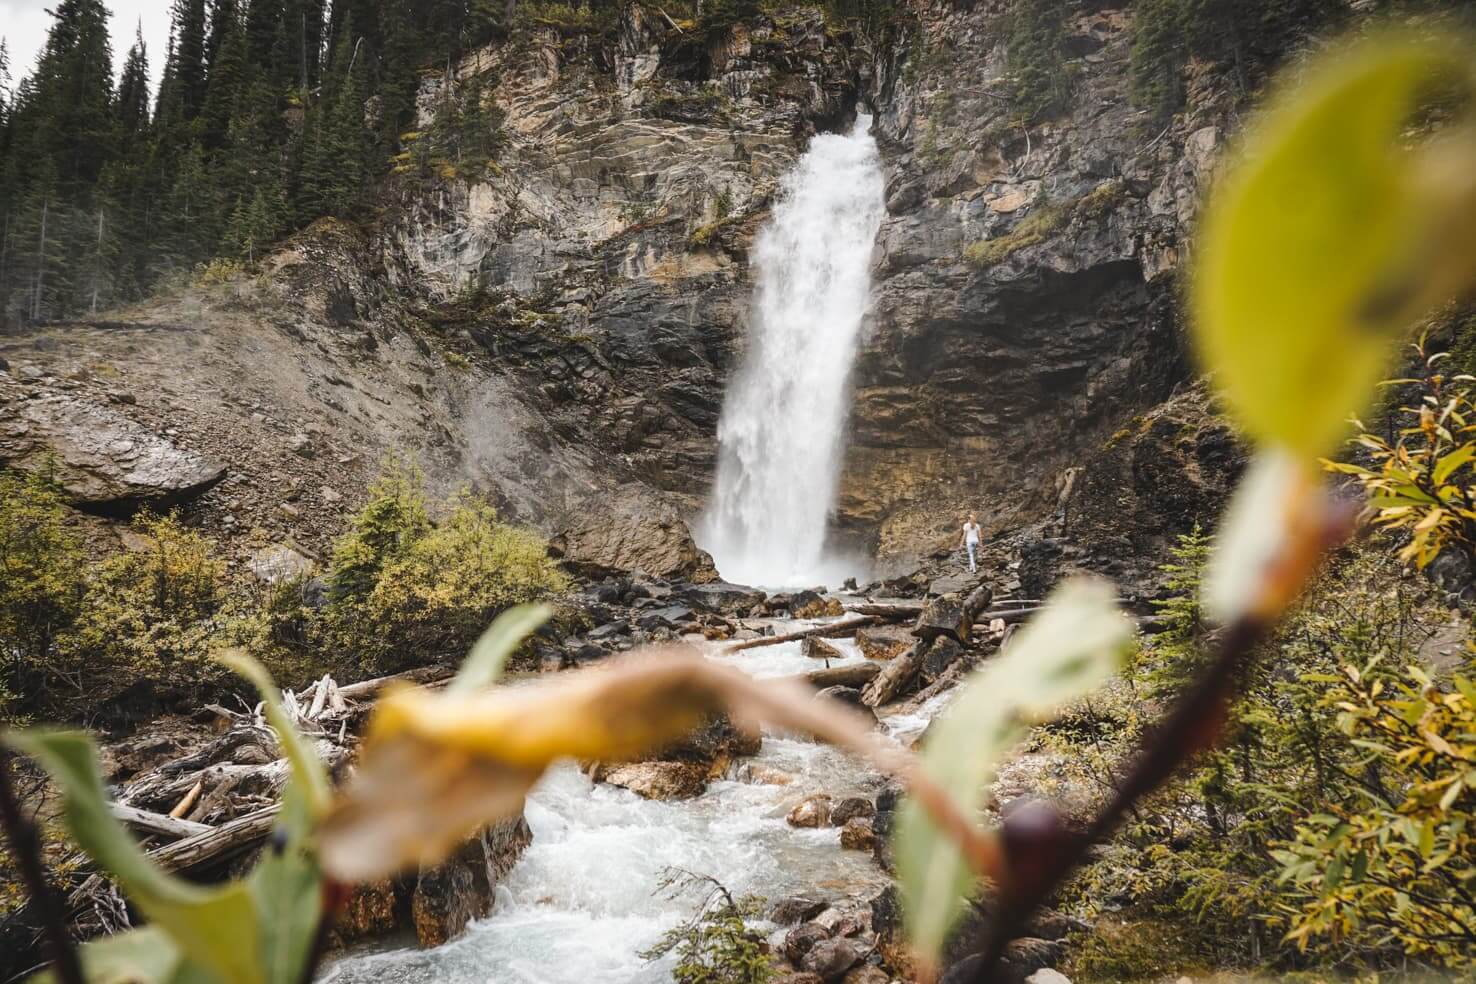
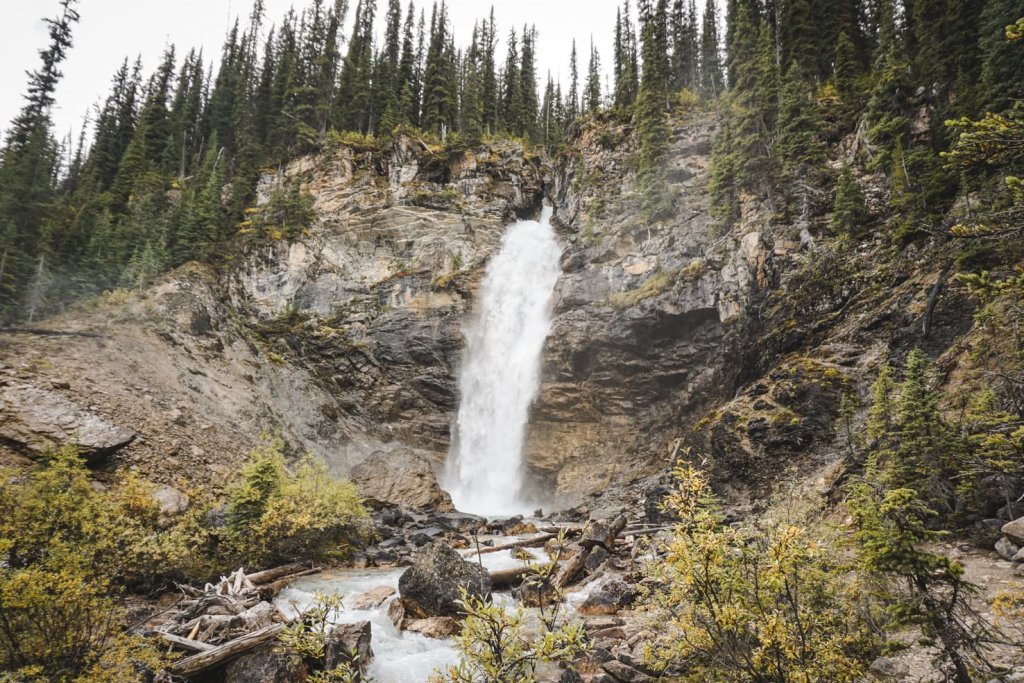
The 4 km long Celeste Lake Trail descends through the forest and passes three green reflecting lakes. When we reached the bottom of the Little Yoho Valley, the trail flattened significantly. Only two kilometres later, we arrived at stunning Laughing Falls. Even though it wasn’t a hot day, I like to get close to the falls for a quick light, refreshing shower.


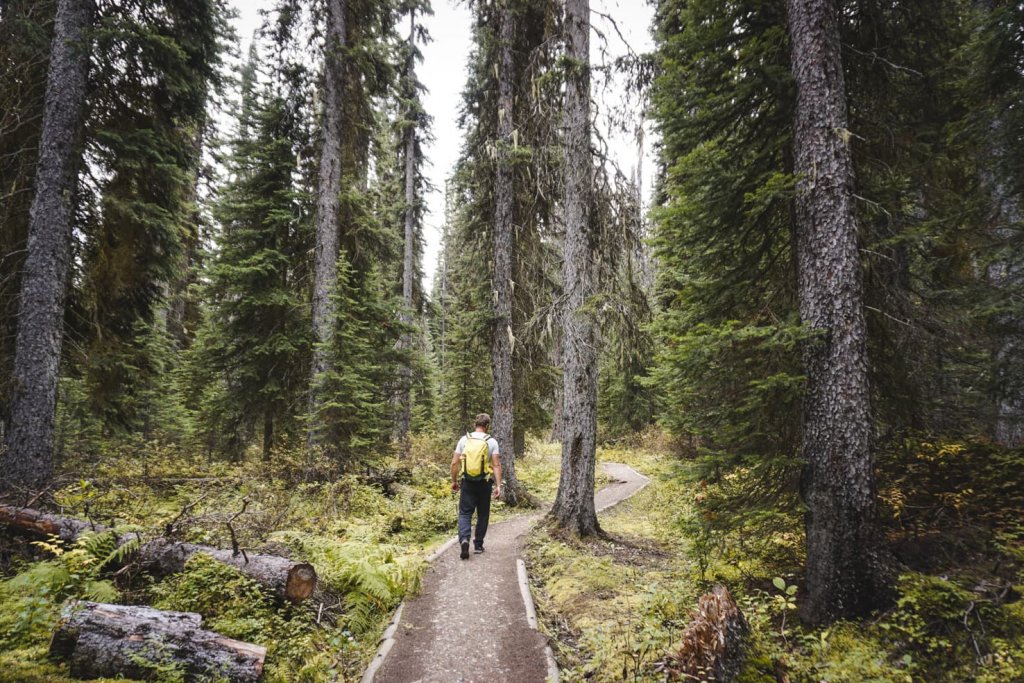
The last 4.5 km is completely flat all the way to the parking lot at Takakkaw Falls. The trail goes through a forest and offer occasional views of the Yoho River or Angel’s Staircase, a cascading waterfall. I was surprised to see this part of the trail man-built and protected the surrounding fragile environment.
Once again we spotted Takakkaw Falls announcing the end of the hike.


If you’re a fan of magnificent views throughout the whole hiking trip, I highly recommend Iceline Trail in Yoho National Park.
I know we’ll be back soon to explore other hiking trails, glaciers and waterfalls! We’re already eyeing Twin Falls, Moraine of Yoho Glacier and the full loop of Iceline Trail to reach the Iceline Summit.

After your hike, I highly recommend fuelling up at Truffle Pigs Bistro in Field. We always eat here whenever we visit Yoho National Park. Their bistro & lodge are fantastic. I often get the Purple Burger with beets patty; it’s so delicious!
Where to next?
Don’t miss the most stunning place in Yoho: Emerald Lake & Takakkaw Falls. Several hikes in Yoho are worth a stop.
Hiking in Yoho National Park
When driving from Banff/Lake Louise, the first hike when you cross the border from Alberta to British Columbia is Sherbrooke Lake, with a stunning and quiet lake. Then there is Iceline Trail, a few hikes leaving from Emerald Lake in the next valley, and Lake O’Hara, which is hard to get to due to daily limits for the shuttle bus.
Golden
This small and charming mountain town offers lots of fun outdoor adventures. You can check out our 3-day Golden itinerary, or 30 fun things to do in Golden.
My favourites are:
Banff National Park
If you’re continuing east to Banff National Park, check out our Adventure travel guide to Banff National Park for activities and tips for visiting.
Just a few stops you shouldn’t miss on your visit are:
- Lake Louise
- Moraine Lake
- Johnston Canyon Hike is open year-round with beautiful frozen waterfalls in winter
- Lake Minnewanka
More hiking ideas
- 15 best day hikes near Calgary
- Hiking in Jasper National Park: 17 best hikes for all levels
- 20 best hikes in Banff National Park
- Hiking in Yoho National Park
Know before you go
National park entrance
When you enter any national park in Canada, you must pay an entrance fee. You have a choice of either a daily pass or a yearly pass.
- 10.50 CAD per person for a daily pass, 21 CAD for a group/family
- 72.25 CAD per person for a yearly pass, 145.25 CAD for a group/family
The yearly Discovery Pass is valid for all National Parks in Canada. You can purchase it at the gate when you enter the national park, in the Visitor’s Centre or online here.
Hiking essentials for Iceline Trail
These are just a few of our hiking essentials. But we do carry a few more things. For the complete list or more details about any of these essentials, read our post Hiking packing list for summer in the mountains.
- Lifestraw bottle with filter (or Thermos if you’re visiting in winter)
You need to carry water in a reusable Nalgene bottle, which I find is the most lightweight bottle, or you need to take a filtration system. In this case, all you need is a bottle with a water filter and fill it up when you arrive at the waterfalls. We always carry LifeStraw bottles on our runs, hikes, and backpacking trips.
- Sunscreen
One of the best-rated sunscreens from EWG, which I use and highly recommend, is Thinksport and Attitude mineral sunscreen. Alternatively, you can pack a sunscreen stick to re-apply during the day without getting your hands messy.
- Repellent
I don’t like DEET repellent’s smell or skin stickiness, so I make my own. It’s been effectively tested in the Canadian backcountry and smells incredible!
My recipe for DIY repellent – combine 200 ml Witch hazel, 5 drops of Lemon essential oil, and 5 drops of Eucalyptus essential oil and pour it into a glass spray bottle. Shake well before each use and spray on your skin or clothes a few times a day.
Alternatively, you can buy biodegradable repellent.
- Bear spray
Bear Spray Repellent is an essential item in the Canadian Rockies. If you’re flying in, you cannot take it on an airplane, but it can be purchased in most outdoor stores or rented at your hotel. Make sure you know how to use it, and keep it close.
Despite popular belief, Parks Canada stated that bear bells are ineffective in deterring bears, and you should make noise while hiking to let bears know you’re there.
- Waterproof jacket
A windproof jacket is a must on any mountain trip. Double bonus if it’s waterproof with breathable fabric as well.
My jacket packs small as it’s from a light fabric, but it’s both windproof and waterproof. Because this shell jacket is an outer layer, you need a fleece or a down jacket for warm insulation.
- Fleece or down jacket
I like to use my comfy soft fleece in spring and autumn when I know I’ll wear it most of the day. When I need to pack a light and small insulating layer into my backpack (especially in summer), I like to use a down jacket that’s lighter than fleece, packs into a little pouch, and uses very little space in my backpack.
- Trail running shoes
My long-time favourite trail running/hiking shoe is Adidas Outdoor Kanadia. They have a waterproof membrane, excellent grip on rocks, and great foot support, and I use them year-round. Michal tried several trail shoes over the last few years, and his favourites for hiking are waterproof Salomon with a wider toe box.
Where to stay when visiting Yoho National Park
Budget pick: HI Whiskey Jack Hostel near Takakkaw Falls is open from late June till September but is currently under construction.
Depending on which direction you’re travelling, you can choose from these options:
- The closest hostel is Dreamcatcher Hostel in downtown Golden offering a shared kitchen and the perfect location close to all amenities. Click here for reviews and the latest prices
- Another option is HI Lake Louise Alpine Centre Hostel with a shared kitchen, sauna, and the epic Lake Louise nearby. Click here for reviews and the latest prices
Value pick: Truffle Pigs Lodge
Truffle Pigs Lodge (our beloved bistro) also offers accommodation in Field. You can choose a single room, a queen room with a kitchenette, a double queen, and a family suite. All offer stunning mountain views!
Luxury pick: Emerald Lake Lodge
Located on the gorgeous Emerald Lake shore, the lodge offers rooms with fireplaces, a private balcony, and the most stunning views.
Click here for reviews and the latest prices
Staying in Banff National Park
We always recommend staying in the campgrounds to have the most freedom and enjoy nature to the fullest while staying on a budget. Check out our Smile Campervans, your home on wheels in the Canadian Rockies.

Camping in Yoho National Park
- Kicking Horse Campground
Both reservable and first-come, first-serve sites are available. This scenic campground is open from May 18 to October 9 and offers sites by the river, in the forest or a meadow. The campsite fee is 29.25 CAD/night, including hot showers and flush toilets.
- Monarch Campground
Only first-come, first-serve sites are available. It’s a basic campground open May 4 to September 18 for a fee of 18.75 CAD/night.
- Takakkaw Falls Campground
Walk-in campsite with a view of the 2nd tallest waterfall in Canada. It’s open from June 15 to October 9 for a fee of 18.75 CAD/night. Only tents are allowed (parking is about 500 meters from the campground, with trolleys available to carry your gear).

- Hoodoo Creek
Hoodoo Creek Campground is furthest from Takakkaw Falls and other Yoho attractions. It’s open from June 15 to September 4 for a fee of 18.75 CAD/night.
- A fire permit costs 9.50 CAD/day, and firewood is provided
- Online reservation, modification or cancellation costs 11.50 CAD
Road closure in Yoho National Park
For trail closures due to wildlife presence or avalanche dangers in Yoho National Park, check out the report from Parks Canada.
Accurate road conditions for Alberta can be checked here and for British Columbia here.
Trail report for Yoho National Park
Before you head out, check current trail conditions on Trail Report from Parks Canada.
Bear Country
As always, you are in a bear habitat in the Canadian Rockies. You should always carry a bear spray (can be purchased at Visitor’s Centre or outdoor stores), know when and how to use it and make noise while hiking and running (so you don’t surprise any bears)! Carefully read these instructions on how to behave around them.
Spread the word! PIN this to your Pinterest board.